
How to Get Started with JavaScript Unit Testing
At its core, a developer’s job is to write application code that implements features and solves business requirements. However, we often fail to examine our code — something necessary to ensure it works as expected and will continue to do so as the program evolves.
We can attribute our complacent testing behavior to the time crunch. The time we devote to testing could affect the code’s implementation. So, too often, we integrate this dreaded task last-minute or — worse — skip it entirely.
But we really shouldn’t be so reluctant to test our code. Tests help ensure high software quality and happy customers.
Unit testing examines a codebase’s individual components to validate that they’ll behave and perform as intended in all possible scenarios. A unit is a program’s smallest component — for example, a method, function, module, or object — that usually performs a single task.
In this article, we’ll discuss the benefits of unit testing. Then, we’ll demonstrate how to write JavaScript unit tests using Mocha and Chai.
Why Bother Performing Unit Tests?
Detects Bugs Early
Often, when changing an application’s code, we unknowingly break some application functions or introduce bugs. In the absence of unit testing, these bugs may not throw any immediate warnings or compiler errors. Our team might still deploy the app to production.
Unit testing helps detect these bugs early in the code development lifecycle. Properly-implemented code function unit tests throw warnings when the slightest misbehaviors occur. So, we have ample time to fix these errors and avoid pushing faulty code to production.
Improves Code Design, Architecture, and Structure
Integrating unit testing in a project’s early stages helps us structure our code and adopt architectural designs and best practices.
For example, assigning multiple responsibilities to a single block of code would be a nightmare to unit-test. We could adopt the model-view-controller (MVC) design pattern to facilitate the proper separation of concerns in the code. This way, testing forces us to implement more robust and scalable code.
Provides Project Documentation
Aside from actual documentation and code comments, test cases defined in clear, descriptive words can form adequate project documentation. When we test each unit, we document the entire application.
Developers onboarding the project can quickly get up to speed by reading each module’s test, developing a thorough understanding of the system and what each component should do.
Set Up Your Environment
Now that we know the benefits, let’s explore how to write unit tests for our code. We first need to set up a project requiring some unit tests. We’ll use the Vite build tool to bootstrap a vanilla JavaScript (JS) project. You can view all the code for this project on GitHub.
Bootstrap the Project
To scaffold a vanilla JS project, first, open a terminal and run this command:
npm create vite@latest {your_app_name} -- --template vanillaNow, navigate into the project’s directory to install the demo’s necessary dependencies:
cd {your_app_name}Set Up Mocha and Chai for Testing and Assertion
Next, ensure you have the latest version of Node.js installed on your machine. Then, install Mocha to organize and run the tests for your project, using this command:
npm install —save-dev mochaWe install Mocha as a dev dependency because our application won’t require it to run in production.
Mocha provides a platform to run the tests, but it can’t define the conditions to test the expressions. So, we need to install an assertion library to verify that an expression is correct and terminate the program whenever it fails to meet a conditional.
Fortunately, quite a few assertion libraries are compatible with Mocha, including Chai. Chai provides a much easier and more readable style for defining complex tests.
Install Chai using the command:
npm install --save-dev chaiUpdating Package.JSON
One file the Vite command generated along with our project is package.json. This file holds and manages metadata relevant to the project, including its scripts. These commands perform specific tasks like building the project for production, running it in development, and testing.
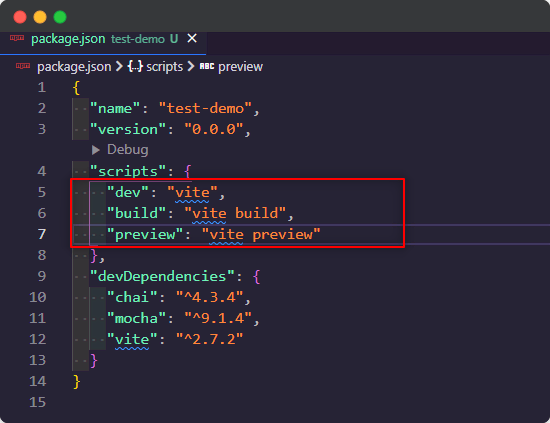
We need to update the scripts property in the package.json file to include the test command so that Mocha can run tests. Open the project in a code editor or run the command below within the project’s directory to launch Visual Studio (VA) Code:
code .Next, open the package.json file. In the scripts property, include the test command and set it to mocha:
scripts:{
...
test: “mocha”
}
Your package.json file should now have the test command, like the image below:

Our project is ready to integrate unit tests with Mocha and Chai.
How to Write Your First Unit Test with Mocha and Chai
In a terminal within the project’s directory, create the file to contain the code:
touch addition.jsAdd the following lines of code to addition.js:
const add = (x, y) => {
  return x + y;
};

module.exports = {
  add,
};
In the file, we define the add function, which returns the sum of two numbers. The modules.exports statement exports the function, allowing other Javascript files to import it. Without this, the test file we’ll create later won’t be able to test the function.
Now, create a new file to write the unit tests for our code. By default, Mocha looks for a /test folder located at the project root and executes all the test files there.
To adhere to these defaults, create a test folder at the project’s root.
mkdir testGo into the test folder and create the file that will contain the tests for the add function:
cd test/
touch addition.test.js
Note that it’s best practice to name test files after the source file or component they’ll be testing to identify their use case easily. Also, test files are JavaScript files, so we simply add the .test extension to identify them.
Your project structure should be similar to this:
|-node modules
|-test
|  |-addition.test.js
|-addition.js
|-main.js
|-index.html
|-package.json
|-styles.css
In the test file’s first two lines, import the add function from the addition.js file and the expect method from Chai:
const { add } = require("../addition.js");
const { expect } = require("chai");
The expect method lets us chain together natural language to create assertions. You’ll get to see this when we begin writing tests.
Now, we’re ready to write our first unit test. So, add the code block below under the test file’s import statements:
describe("the add function", () => {
  it("should add two numbers", () => {
    const result = add(2, 2);
    expect(result).to.be.equal(4);
  });
});
The code block above uses two main functions: the describe() and it() functions. The describe() function groups all test cases our code should pass. It takes two arguments: the test group’s name, and a callback function where we define all the tests. The it() function identifies individual test cases. It takes two arguments: a string explaining what the test should do, and a callback function containing our actual test.
Notice how we can read the string passed to the it() function along with the it keyword as “it should add two numbers.” This approach easily conveys the test’s purpose — in this case, to verify that the add function correctly adds two numbers.
In the it() function’s first line, we call the add function imported at the top of the test file with the arguments “2” and “2,” then store the value in the variable result.
When adding the numbers 2 and 2, we expect the result to be “4.” We verify this in the it() function’s second line using the expect interface from Chai. This line reads like plain language and is easy to understand.
Now, we can run the tests. In a terminal, run the command:
npm testA successful test should produce the output in this screenshot:
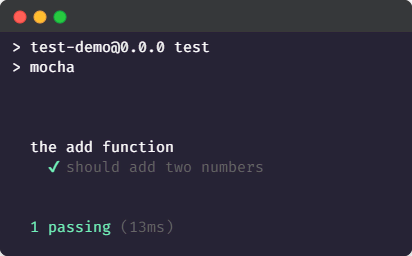
The output shows the test groups that ran with individual test cases indented below. The tick mark indicates the test passed. The output also specifies the number of tests passed (one in this case) and how long the test ran (this varies from computer to computer).
Writing More Unit Tests
Unit testing shines when we start thinking of all the ways the specific unit we’re testing would behave when it receives diverse data sets.
For example, the add function returns the sum of the two numerical arguments it receives. But what happens when it receives a single numerical argument? We can write a unit test to define how it should behave in such a scenario.
So, update the test file to include the test case below:
it("should be able to handle a single argument and return 0 when no arguments are passed", () => {
    const case1 = add(2)
    expect(case1).to.be.equal(2);
    const case2 = add();
    expect(case2).to.be.equal(0);
  });
The code block above tests that the add function doesn’t break up when it receives a single number. The function should return that number. When the code passes no arguments, the function should return “0.”
If we run the test at this point, we can expect it to fail:
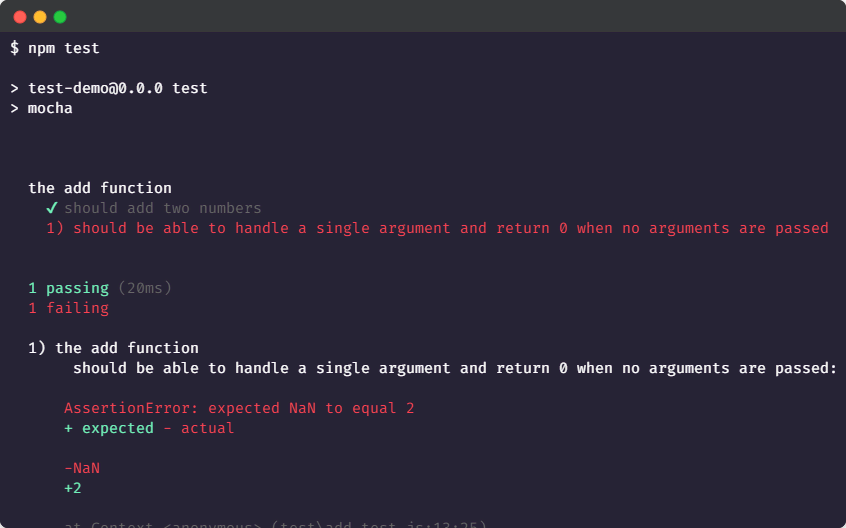
It fails because, at the moment, we haven’t implemented the code to handle one or no numbers, so it doesn’t meet the test’s requirements. The code assigns the number two to the parameter x, but y is left undefined. “2” plus an undefined value is not a number. So, the function returns “NaN” (representing “Not a Number.”)
To meet the requirements, we can update the add function to use default parameters, initializing them with the value 0:
const add = (x = 0, y = 0) => {
return x + y;
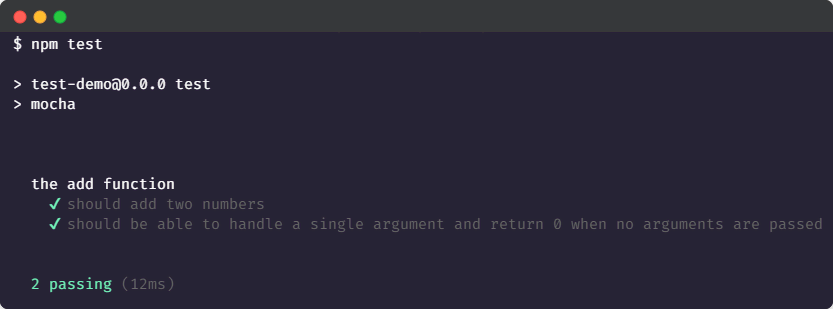
};This way, when the code passes a single number to the add function, it assigns the first parameter its value. The second parameter receives the value “0” instead of “undefined.” Now, adding “2” and “0” returns “2” rather than “NaN.” Also, it will return “0” when no arguments are specified.
Now that you’ve fixed your code, you can run the test and expect it to pass.
Wrapping Up
Unit tests help developers detect code defects earlier, follow best practices, and limit introducing bugs to the code. Although they may seem like a time investment at first, these tests help catch issues earlier, when they’re easier to find and fix, ultimately saving time while producing better-quality code.
This blog post was created as part of the Mattermost Community Writing Program and is published under the CC BY-NC-SA 4.0 license. To learn more about the Mattermost Community Writing Program, check this out.


