
How to Use Redis at Scale with Golang and Kubernetes
Imagine that every time you want something for your website, you send a query to your database. Your database then fetches the results or performs some operation and then gets back to you.
Everything worked great so far! But over time, you notice that the traffic to your website is dropping. People have switched to your competitor, and you sit there wondering what went wrong.
Microservices need to be blazing fast to deliver the strongest user experiences. But when your website is experiencing peak traffic, the strain on the database is immense. With concurrent requests and extreme loads, traditional database performance declines significantly. While users wait for responses from your site, your competitor serves similar results in under a second — which means your user experience is declining, and your audience is moving on.
As this vignette illustrates, you can’t afford to have your database act as a bottleneck for microservices. To make sure that doesn’t happen, it’s important to invest in databases or caches that scale and deal with all of these issues — like Redis and CockroachDB.
In This Guide: Setting Up Blazing-Fast Microservices at Scale
This guide explores how to use Golang to create a data pipeline microservice that automates the generation and distribution of unique coupons that are served to consumers in various regions in the world. Additionally, the guide also covers important concepts of Redis, including get/set key-value pairs, event streaming, and flushing.
Finally, the guide covers how to set up a Redis instance and your Docker container as a distributed microservice on our local Kubernetes cluster set up on Minikube. This is important as Kubernetes — used by tech giants like Google and Amazon — is leading the race of deploying and handling excess loads; as such, this will help you understand a bit about how distributed architecture works.
Here are the main topics covered in this guide:
- Set up a Redis Instance and Connect a Golang App
- Set up Redis Event Streams to Handle Basic Key-Value Operations
- Create a Redis Consumer Group
- Deploy a Microservice on Kubernetes via Minikube
- Minikube Cluster Architecture Overview
Set up a Redis Instance and Connect a Golang App
Redis defines itself using the term “real-time data platform.” This way, Redis does not limit itself to a database or a cache but incorporates a wide variety of features competing with functionalities of Databricks, AWS, Kafka and many more leading platforms — including pub/sub, streaming, and more.
go-redis is a package written in Golang that enables Redis functions to be executed in your Go application. You need to have environment variables to connect to the Redis database because you need to configure the application in such a way that it connects to a deployed Redis instance as we don’t have a local host over there.
Redis provides functions that help you understand the errors and the status of the commands. First, you will need to start Redis using a Docker container. Run this container in the background.
$ docker run --name coupon-redis-instance -p 6379:6379 -d redisYou can execute Redis commands using the interactive terminal of the Docker container.
$ docker exec -it You may use dependency injection for your packages and functions in Golang. This means that each package must be a part of the struct or interface. This way, you’ll have a streamlined flow of data and you can add dependencies to this struct so that it can be used by the respective functions. It’s better than explicitly importing and using the library redeclaring the instances of dependencies.
You’re using a function that you can call from your router using dependency injection. This should be called before initializing the main router, and you should handle the case if you cannot connect to Redis. It is a good practice to use a logging framework like Zap in the project. Zap provides performance critical logging which is very essential for debugging and understanding errors.
// StreamController is the Upload route handler
type StreamController struct {
   logger *zap.Logger
   rdbi   *redis.Client
}

// NewCouponStreamController returns a frsh Stream controller
func NewCouponStreamController(logger *zap.Logger, instance *redis.Client) *StreamController {
   return &StreamController{
       logger: logger,
       rdbi:   instance,
   }
}
By now, you’ve covered your dependency handling mechanism. After a connection has been established, it’s a good practice to check the status of the data platform to see if everything is up and running. Redis makes this easy using the Ping command. If it returns Pong, you are good to go.
For what you’re building, you can flush the Redis database very easily. For example, if you want to flush the cache at midnight every day, you can do so using go-cron.
It should be noted that a context element is used in go-redis. Context is an integral part of the concurrent architectures providing important signals like deadlines and cancellation and is used extensively in gRPC infrastructure. You can use an empty context, however, if you need to. You can call the commands like ctx.Done() to prevent complex race conditions.
var ctx = context.Background()

// function to flush to the database
func flushdb(rdbi *redis.Client) {
   rdbi.FlushDB(ctx)
}

// This function is called by the main server to get the Redis instance.
// The instance is again returned to the controller for this package. Now all the functions can access this like zap logger.
func RedisInstanceGenerator(logger *zap.Logger) *redis.Client {

   // declare the essentials and make redis connections
   var host = "localhost"
   var port = "6379"

   // get credentials from the Environment Variables
   if os.Getenv("REDIS_HOST") != "" {
       host = os.Getenv("REDIS_HOST")
   }
   if string(os.Getenv("REDIS_PORT")) != "" {
       port = string(os.Getenv("REDIS_PORT"))
   }

   // Declare the redis client
   // You can store a password as an environment variable. However, I wont use this for simplicity.
   client := redis.NewClient(&redis.Options{
       Addr:     host + ":" + port,
       Password: "",
       DB:       0,
   })

   // check status of connection.
   // It returns "PONG"
   _, err := client.Ping(ctx).Result()

   if err != nil {
       logger.Error("Redis connection failed")
       return nil
   }

   // Lets call zap to get the instance.
   logger.Info("Redis Instance Started", zap.Any("server details", map[string]interface{}{
       "Host":    client.Options().Addr,
       "Network": client.Options().Network,
   }))

   // this will make sure that every day at midnight, the database is flushed.
   gocron.Every(1).Day().At("00:00").Do(flushdb, client)

   // return the client to be used to router controller.
   return client
}
Set up Redis Event Streams to Handle Basic Key-Value Operations
Good work setting up and connecting to your local Redis instance! Now, you need to design routes for your microservice.
You have a coupon object in your store folder of the form with a Coupon Code, Name, Description, VendorName, and Region. Here, the region specifies where the coupon should go to.
Currently, there are four main regions:
- APAC (Asia Pacific),
- NA (North America),
- SA (South America), and
- EU (European Union).
All of these regions want coupons that will be provided, and some vendors may have stores in multiple regions. So, this gives vendors the power to specify coupons based on specific regions.
type Coupon struct {
   Code        string `json:code`
   Name        string `json:name`
   Description string `json:description`
   VendorName  string `json:vendor`
   Region      string `json:region`
}
Redis provides many data structures for utilities you might need — like strings, lists, hashes, and hyperloglogs (used for counting). Here, you want the vendors to provide coupons using REST API by making a POST request for coupons. So, you will need to store the vendor name as well as all the coupons provided by the vendor. You can use Redis Lists for this purpose.
Whenever a vendor posts a coupon, you can add this to a list referenced by the vendor name as the key. You can look at this like a cache that stores keys as a string and lists as the values. These lists are highly performant and the ideal choice. But you want the cache to remain a reasonable size — so you’ll need to flush this every 24 hours.
Further, you can add to Lists using LPush and RPush commands. If the vendor is not there, these commands add a new key-value pair. To prevent new key-value pairs, you can use LPushX and RPushX.
Now, you have multiple consumers constantly waiting for coupons to distribute, and they’ll wait until they’re provided. You also have coupons corresponding to each consumer. All of the consumers want the coupons simultaneously, so you must be able to send the coupons based on availability to two or more consumers at the same time.
The solution to this problem is event streaming in Redis!
You’ll have four streams being consumed by the four regions. As soon as the POST request is processed, a coupon is added to the vendor list and then to the stream based on the region field of the coupon. These are being constantly polled by multiple consumers using a concept called consumer groups.
func (ctrl *StreamController) AddCouponList(rw http.ResponseWriter, r *http.Request) {
   coupon := store.Coupon{
       Name:        r.Header["Couponname"][0],
       VendorName:  r.Header["Couponvendor"][0],
       Code:        r.Header["Couponcode"][0],
       Description: r.Header["Coupondescription"][0],
       Region:      r.Header["Couponregion"][0],
   }

   couponJson, err := json.Marshal(coupon)
   if err != nil {
       ctrl.logger.Error("Cannot Marshal coupon", zap.Error(err))
       rw.WriteHeader(http.StatusInternalServerError)
       rw.Write([]byte("An Internal server error occurred"))
       return
   }

   // this automatically handles cases for new users.
   // if we want an already existing list and not create a new list, we use lpushx/rpushx
   _, err = ctrl.rdbi.RPush(ctx, coupon.VendorName, []interface{}{couponJson}).Result()
   if err != nil {
       ctrl.logger.Error("Fatal Redis Error", zap.Error(err))
       rw.WriteHeader(http.StatusInternalServerError)
       rw.Write([]byte("An Internal server error ocurred"))
       return
   }

   // We have 4 regions. I want 4 streams to be there for each region. This will be given by Couponregion.
   // Any number of consumers can poll from this stream coming from that region.

   // it will be wise to put a string check over here. We dont need to add new streams if region is corrupt in Http request
   // Also, we need pretty flexible region names. We need to minimize Hardcoding in our application.
   region := r.Header["Couponregion"][0]
   if region != "APAC" && region != "NA" && region != "EU" && region == "SA" {
       // region does not exist.
       rw.WriteHeader(http.StatusBadRequest)
       rw.Write([]byte("Provided Region does not exist"))
       return
   }

   err = ctrl.rdbi.XAdd(ctx, &redis.XAddArgs{
       Stream: "coupon-" + r.Header["Couponregion"][0],
       Values: map[string]interface{}{
           "coupon": couponJson,
       },
   }).Err()

   if err != nil {
       ctrl.logger.Error("Fatal Redis Error", zap.Error(err))
       rw.WriteHeader(http.StatusInternalServerError)
       rw.Write([]byte("An Internal server error occurred"))
       return
   }

   ctrl.logger.Info("Coupon added to the stream")

   rw.WriteHeader(http.StatusOK)
   rw.Write([]byte("Coupon added to Region Stream"))
}
Create a Redis Consumer Group
At this point, you have your streams set up, and four streams are waiting for your consumers to subscribe to them and get the coupons.
Suppose you have multiple instances of your consumer-based application. In that event, you’d want each instance to get a coupon only once. Redis Streams provides this functionality using consumer groups.
Multiple clients can subscribe to a stream as a consumer group. Each consumer in the group is guaranteed to get the coupon only once. You can even acknowledge the messages received by the consumer groups using the XAck command.
The XReadGroup has an argument called Streams, which is a list of strings. If you want to ensure that the message you received hasn’t been sent to someone else, you must add a special id “>”. This adds a message to the history so you can be sure of a unique delivery.
// A very simple consumer application
func main() {
   // instances that connect to the stream to read data are consumers.
   // we use consumer groups to get read scalability.

   // declare the essentials and make redis connections
   var host = "localhost"
   var port = "6379"
   if os.Getenv("REDIS_HOST") != "" {
       host = os.Getenv("REDIS_HOST")
   }
   if string(os.Getenv("REDIS_PORT")) != "" {
       port = string(os.Getenv("REDIS_PORT"))
   }
   client := redis.NewClient(&redis.Options{
       Addr:     host + ":" + port,
       Password: "",
       DB:       0,
   })

   area := "coupon-EU"

   // lets create a consumer group
   status, err := client.XGroupCreate(area, "client-EU", "0").Result()
   fmt.Println(status)

   if err != nil {
       fmt.Println("Could not create group", err)
       return
   }

   // XReadGroup is used by groups to read from stream.
   // Here we are using a special consumer id ">". This ensures that the message we are getting has
   // never been sent to another consumer.
   // However, if you dont specify ">", you will get pending messages which have not been acknowledged.
   // XAck command removes the message from the history.

   // if we set NoAck true, this means our message is added to the message history of pending messages.
   // We can call XAck when the coupon code has been used by the client.
   streamData, err := client.XReadGroup(&redis.XReadGroupArgs{
       Group:    "client-EU",
       Consumer: "consumer-1",
       Streams:  []string{area, ">"},
       Count:    1,
       NoAck:    true,
   }).Result()

   // Here XReadGroup will wait indefinitely for messages if the stream is empty. As soon as
   // there is a message, it will poll the COUNT number of messages and then exit.

   if err != nil {
       fmt.Println("Could not Read from stream", err)
       return
   }

   fmt.Println(streamData)
}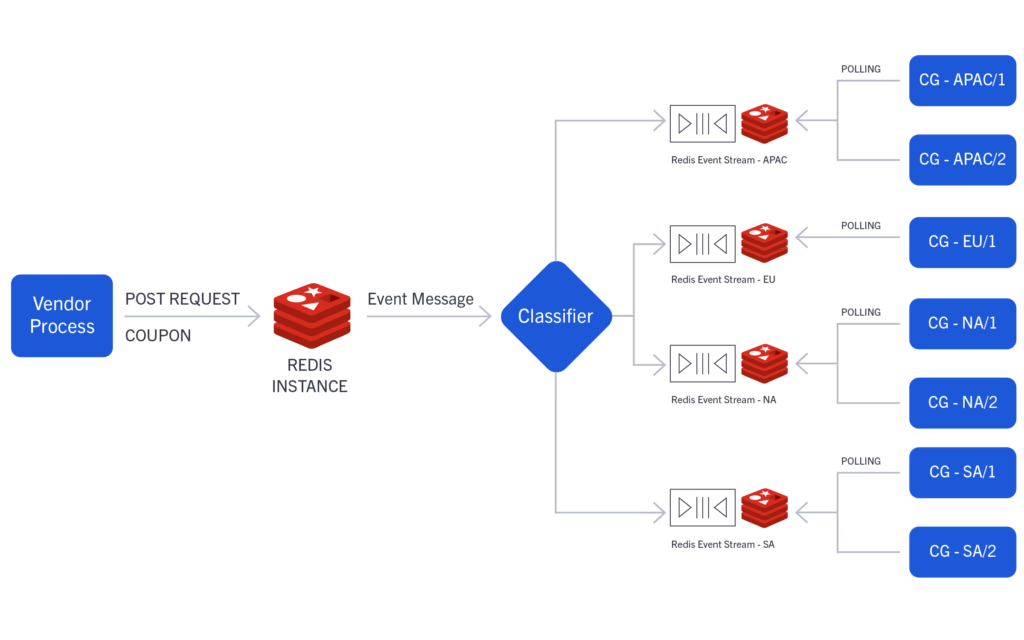
In the above diagram, CG refers to consumer groups of the respective region.
Deploy a Microservice on Kubernetes via Minikube
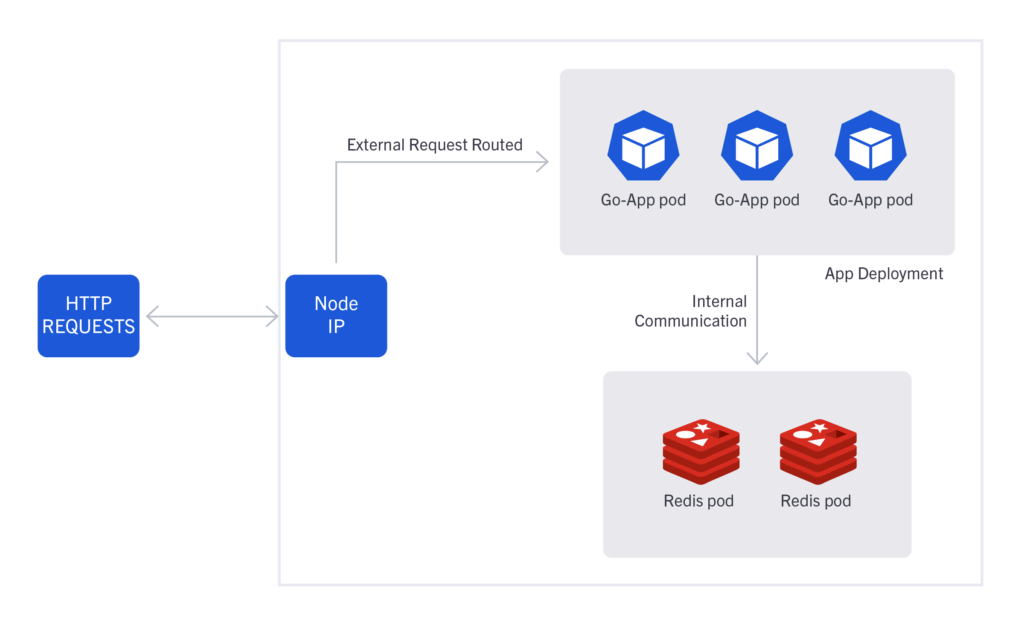
Deployments and services are terms that correspond to Kubernetes. A deployment can be seen as a cluster of instances of an application (known as pods). So, you can have “n” instances running in your Kubernetes, and together they will be identified by deployment.
For internal communication of your running instances, you need services to assign an IP address to your pods. Nodes are physical machines that are running your pods. When a request is made to the node’s IP and port, it forwards the request to the pod’s IP and port and acts as an automatic load balancer if multiple pods are running in your Kubernetes cluster.
Minikube is a very simple Kubernetes cluster containing only one node. This node will have an IP address that you can use to send HTTP requests. Here’s how you can get this IP address:
$ minikube ipFirst, build your Docker image and push it to Docker Hub:
$ docker build . -t /product-go-micro
$ docker push /product-go-micro
You will need to log in to Docker. You can use Docker Hub to host your image so that it can be fetched from the Minikube cluster automatically. This is done by specifying an image name in the deployment.
First, let’s create deployments for the Redis instance and our app instance. These are simple YAML files. Let’s take a look at a deployment for Redis:
apiVersion: apps/v1
kind: Deployment
metadata:
  name: redis-coupon-db
  labels:
    app: redis
spec:
  selector:
    matchLabels:
      app: redis
      mservice: coupon
      type: db
  replicas: 2
  template:
    metadata:
      labels:
        app: redis
        mservice: coupon
        type: db
    spec:
      containers:
      - name: coupon-db
        image: redis
        resources:
          requests:
            cpu: 100m
            memory: 100Mi
        ports:
        - containerPort: 6379
This spins up two Redis instances inside the node, both of which are listening on port 6379. You need labels to link the pods to the service for networking. All of the pods or instances spun up use these labels.
Now, you can look at the deployment for your app.
apiVersion: apps/v1
kind: Deployment
metadata:
  name: product-go-micro
spec:
  replicas: 3
  selector:
    matchLabels:
      app: product-go-micro
  template:
    metadata:
      labels:
        app: product-go-micro
    spec:
      containers:
      - name: product-go-micro
        image: shadowshotx/product-go-micro
        imagePullPolicy: IfNotPresent
        resources:
          requests:
            cpu: 50m
            memory: 50Mi
        ports:
        - containerPort: 9090
        env:
        - name: REDIS_HOST
          value: redis-coupon-db
        - name: REDIS_PORT
          value: "6379"
This spins three pods up providing environment variables. Here, the environment variables are also specified and are used in the code above.
Now, you can set up the services to enable networking. You don’t want the Redis instance to be accessible from the outside using normal HTTP commands. So, you can use ClusterIP that enables only internal communications. In service, you use selectors to select the pods with the specified labels.
apiVersion: v1
kind: Service
metadata:
  name: redis-coupon-db
  labels:
    app: redis
    mservice: coupon
    type: db
spec:
  type: ClusterIP
  ports:
  - port: 6379
    targetPort: 6379
  selector:
    app: redis
    mservice: coupon
    type: db
You’ll need to interact with your application alone. So, you can’t use a ClusterIP. But you can use a NodePort type service. When a node receives a request to its port, it acts as a load balancer and distributes the requests to the running pods evenly.
kind: Service
metadata:
  name: product-go-micro-service
spec:
  type: NodePort
  ports:
  - name: http
    port: 9090
    targetPort: 9090
  selector:
    app: product-go-micro
Now, you can apply deployments and services using kubectl. After the services have been enabled, you can access your pods using curl.
$ kubectl apply -f couponservice/deployments/redis-deployment.yaml
$ kubectl apply -f couponservice/deployments/redis-service.yaml
Next, wait for the Redis Instances to get up and running. Then run the following commands:
$ kubectl apply -f couponservice/deployments/go-micro-deployment.yaml
$ kubectl apply -f couponservice/deployments/go-micro-service.yaml

$ curl 192.168.49.2:30271/coupon/addcoupon --request POST --header 'Couponname:off_50_flat' --header 'Couponvendor:vendor1' --header 'Coupondescription:Avail flat 50 off on all products' --header 'Couponcode:EU778' --header 'Couponregion:EU'You can get the port by looking at the port of the service.
Minikube Cluster Architecture Overview
The inside of your Kubernetes cluster will look something like this:
Thanks for reading! I hope you learned some deep concepts of Golang, Redis, and Kubernetes. This guide also covered a very basic part that enabled the Kubernetes cluster to fetch from Docker Hub. If you’re interested, all of the code found in this blog post can be found on GitHub.
Now that you’re familiar with using Redis at scale with Go and Kubernetes, it’s time to take these learnings and use them to build a microservices-powered application that’s highly performant at scale. I’m looking forward to seeing what you build.
This blog post was created as part of the Mattermost Community Writing Program and is published under the CC BY-NC-SA 4.0 license. To learn more about the Mattermost Community Writing Program, check this out.


