From checklist to playbook: Creating structure for your processes
Playbooks aim to be a super-powered checklist for repetitive tasks. Before you can get to the “super-powered checklist,” though, you need to identify the process that you’ll use to build your first playbook and create a structured process as a Playbook checklist. Let’s go on that journey today.
What are Playbooks?
This blog will cover some intro topics; however, it won’t introduce you to Playbooks for the first time. For that, I recommend our Getting Started with Playbooks blog post. But before we dive in, here are some quick definitions within Playbooks that you’ll come across in this piece.
- Playbook(s) – The templates you create to reuse.
- Run(s) – The individual instances of that playbook.
To put this in another old-school way: Imagine you’re in the break room, standing in front of your copy machine. A “playbook” is the original copy you put on the scanner, and each “run” is what the copy machine prints out. If this still isn’t clear, check out our docs on this.
With that, off we go!
Step 1: Identify a good process for a playbook
Identifying where to start for playbooks can be complicated and sometimes a bit challenging at first because you don’t know what sets a great playbook apart from a mediocre one.
If you have a pen and paper, or your favorite text editor, using that as we explore our checklist would be helpful, but not required!
Let’s narrow playbooks down to a single process you have to do, and let’s “playbook-itize” that single process. The best playbooks have a semi-structured flow involving multiple parties that you end up repeating, usually at least a couple of times a year. Here are a few questions to help narrow down a process in your mind:
- What’s a process that you have to do repetitively?
- Does this process have a semi-structured flow to it?
- Do you have to involve multiple people within your organization? Maybe they have a small part to play in your process.
Hopefully, you’ve narrowed this down to a single process. If you haven’t, here are some ideas that I frequently turn into a playbook:
- Travel planning
- IT/system outages
- Purchase approvals
- New employee on/off-boarding
- Product releases
- Office parties
- Almost any standard operating procedure (SOP) that you have
I will use travel planning as my starting point for the remainder of this post.
Step 2: Make your process checklist
We have our process, but we need to know what’s next. If you’re starting from a structured SOP, then you may be able to skip over most of this.
To make this easier, let’s start to think of all the items that go into our one task. These are essentially your checklist items. Continuing with the travel planning example, below might be the list of tasks to do:
- Designate a travel planner.
- Confirm a budget for travel.
- Collect everyone’s information to book airfare.
- Book a block of rooms.
- Send reminder email week of travel.
- Confirm all expenses have been correctly submitted.
- Debrief with the team.
Remember, your checklist doesn’t have to be perfect, and we can always add/remove it from our list. That’s the beauty of a template, and one of the strengths of having a dynamic playbook!
Now, hopefully, you noticed something important. The items we listed in the step above exist in multiple categories based on the phases of the process.
Let’s break travel into the various phases that you might encounter:
- Planning phase – You decide who’s going on the trip, where it’s going, the budget, etc.
- Booking – This would be where you spend the budgeted money on hotels, cars, visas, etc.
- Pre-travel – The day/week before you confirm everything with everyone.
- Post-travel – Once everyone returns.
Step 3: Turning our checklist into a playbook
Great! Now we have everything we need to start building a playbook.
Create the playbook
Go ahead and open your Mattermost and start building a blank playbook. We will name ours “Travel Planning” and make it a public playbook so anyone on the team can access it.

Build the groups
Now we will take what we created above and build them into the playbook checklist. You should see a default checklist for your playbook under the Outline section. That checklist consists of two parts:
- The grouping of checklist items. These groups are frequently called the phase or header. Each grouping is just a visual way to separate the checklist items and quickly identify where you are in your process.
- The checklist item itself. These live within the grouping and should be directly relevant to the checklist items around it. If you find yourself adding items under a group that doesn’t directly relate, you may have uncovered another phase of your process you should explore.
Let’s create the grouping of items first. These can map the phases of the process, and for our example, we had four: Planning, Booking, Pre-travel, and Post-travel.
Click Add Checklist, fill in the checklist name with your phase, and save that grouping.

You can refer to our documentation on making checklists here.
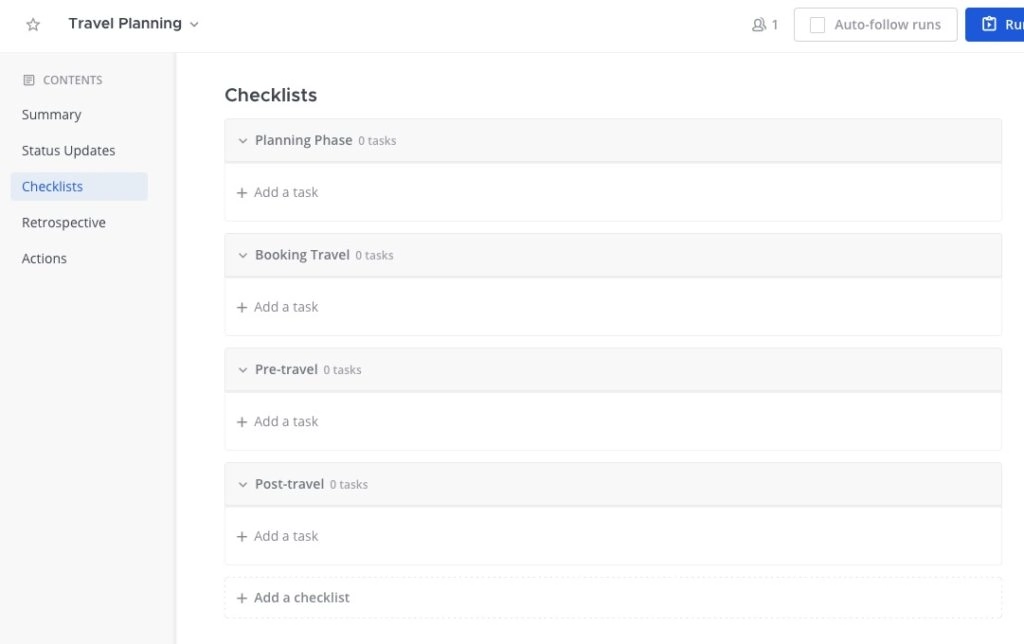
Following my travel example, your playbook should look like this now.

Fill in the checklist items
Great! So we have our groupings created, and all that’s left is to fill in the actual checklist items we made above or from your SOP. This is the easy part.
Let’s make the first “Planning Phase,” and you can fill in the rest. Our checklist consists of the following items:
- Designate a travel planner.
- Confirm a budget for travel.
- Collect everyone’s information to book airfare.
- Book a block of rooms.
- Send reminder email week of travel.
- Confirm all expenses have been correctly submitted.
- Debrief with the team.
Let’s only pull out the values that fit inside the “Planning Phase.” Easy for us, it’s just the top two: Designate a travel planner and confirm a budget for travel.
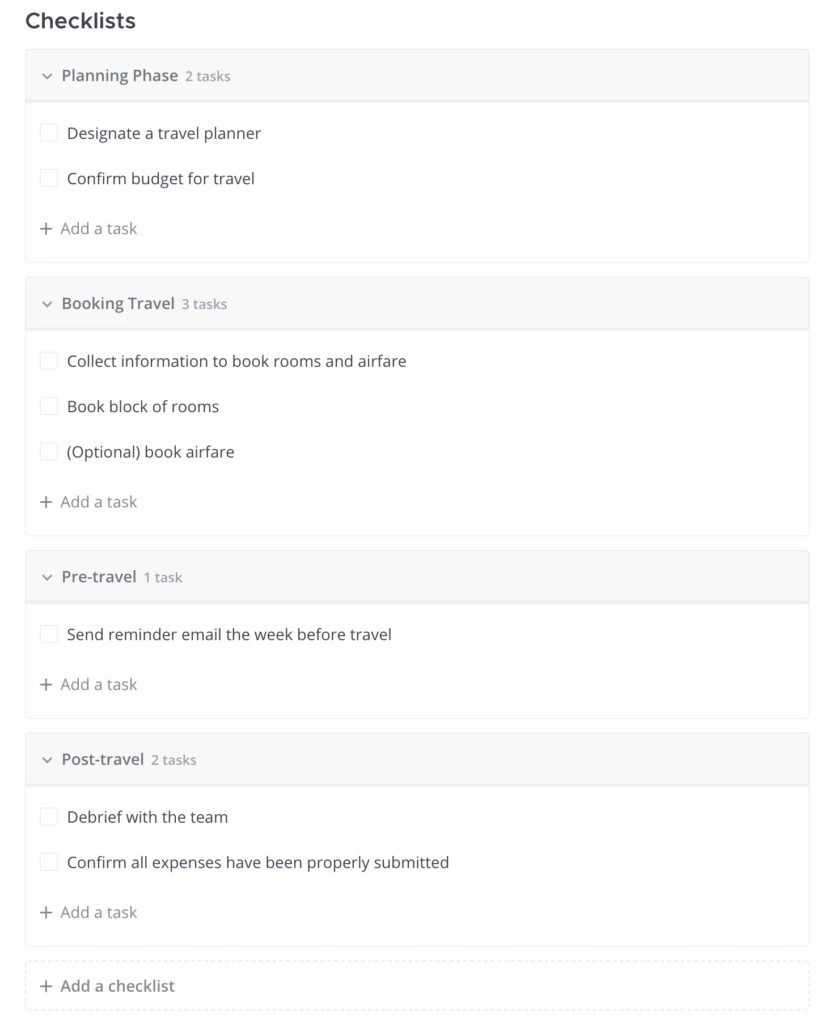
You’ll click the Add a task button inside the planning phase group and add each checklist item. Now that you’ve done that, finish with the remaining phases of our travel process or your process. When it’s all done, you’ll have something like this:

Next steps
Whew. It might not feel like much, but we’ve created a playbook at this point! Our playbook is repeatable, and you can use it every time you need to travel. Hopefully, you feel confident to apply this knowledge to your checklists, SOPs, and other processes.
I know you don’t want to leave it here, though. The next step is to supercharge your playbook with automation, performance metrics, and more. We’ll dive deeper into this topic in a future post, but if you’re itching to supercharge now, check out our Customize Your Playbook documentation, along with Notifications and Updates, and Metrics!


