How to Unit Test with Python
Confidence in the quality, robustness, and reliability of a product are among the most valuable qualities sought after by consumers as well as businesses. This confidence is built through the rigorous testing of a product.
In software engineering, practices like extreme programming (XP) and test-driven development (TDD) champion the belief that automated testing should be used from the start of a project. This means writing tests before any features are built so that a high level of confidence is instilled in the product from the very beginning.
Using this approach ensures that each piece of functionality will fulfill its intended purpose. There’s also the added benefit of ensuring that the functionality conforms to the requirements and acceptance criteria set out by the design from the very start.
Unit tests are the fastest and most common type of automated testing available for software projects.
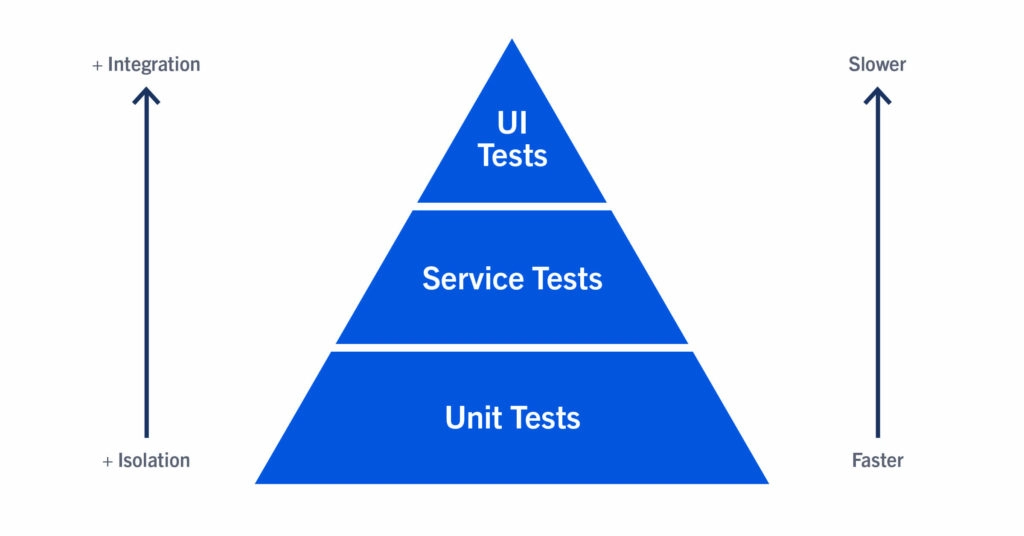
Forming the base of the testing pyramid, unit tests check small, individual units of functionality in isolation. This also means they’re the fastest tests to run, carrying out hundreds of tests in seconds. This fast execution speed is the reason why they’re also the most abundant.
In this article, we’ll demonstrate how to start unit testing in Python.
Writing a Unit Test
In this tutorial, we’ll build a basic method called my_sum, which takes a pair of variables (we’ll call these a and b) then, inside the function, each variable will be added together before being returned. For example, if we passed 5 and 10 as inputs, it would return 15. Only numbers will be accepted as valid inputs, so we’ll add error handling for any inputs that don’t fit this requirement.
The first thing we’ll need to do is to create a file called test_my_sum.py. In it, we’ll start by pulling the Python package unittest using the line. This will give us access to the TestCase keyword we’ll need to build our tests.
import unittestNow that we have this, we can build our first test. First, we check the type of our function’s output.
from my_sum import my_sum

class TestingMySum(unittest.TestCase):
    def test_my_sum_returns_correct_int(self):
        response = my_sum(5, 10)
        self.assertTrue(type(response) is int)
We now have our first unit test!
The first line of the function calls our my_sum function, passing 5 and 10 as inputs. The final line above is known as the test assertion. A test assertion is a condition that we are expecting the functionality we are testing to conform to. These are often directly or indirectly linked to the acceptance criteria or requirements you are working from. This link between assertions and acceptance criteria is why it’s critical to use the correct assertions when ensuring that the software is actually doing what is expected.
At the moment, this unit test is checking whether the response we receive from our my_sum function is a whole number (also known as an integer). If it is, the test will pass. If not, it fails and shows us an error so that we can find out why it isn’t passing.
If we were to run this test now, it would show an error. This is because there’s no my_sum function available. So let’s add one.
def my_sum(a, b):
    return a + b
The code above will get our test to pass. However, there are many scenarios that we aren’t currently checking, so we’ll add some extra assertions.
First, let’s add a check right after our type check for whether the correct value is returned. In our existing test, the correct value is 15.
self.assertEqual(response, 15)The assertion above compares our response with a constant value. In addition to this, we’ll want to add some more tests to check whether our functionality works with floating-point and negative numbers.
def test_my_sum_returns_correct_float(self):
    response = my_sum(5, 10.5)

    self.assertIsNotNone(response)
    self.assertTrue(type(response) is float)
    self.assertEqual(response, 15.5)

def test_my_sum_returns_correctly_with_negatives(self):
    response = my_sum(-5, -10)

    self.assertIsNotNone(response)
    self.assertTrue(type(response) is int)
    self.assertEqual(response, -15)
We’ll also want to make sure that our function is returning an error when it’s passed bad inputs. These bad inputs could be letters or objects. To do this, we’ll create some new tests and use the assertRaises assertion, which is structured a little differently from the others.
def test_my_sum_raises_exception_when_passed_strings(self):
    self.assertRaises(TypeError, my_sum, “hello”, “world”)

def test_my_sum_raises_exception_when_passed_lists(self):
    self.assertRaises(TypeError, my_sum, [6, 7], [1, 2])
Finally, to get these new tests passing, we’ll need to add some error handling within our functionality. This can be done by modifying our existing code to use the isinstance method to check the types of the inputs and then raising a TypeError if the type is not an integer or a float.
def my_sum(a, b):
    if isinstance(a, (int, float, complex)):
        if isinstance(b, (int, float, complex)):
            return a + b
    raise TypeError
Running a Unit Test
Next, we’ll look at running our tests. Before we actually run our test, however, we’ll add an entry point by adding the following two lines to the end of our test_my_sum.py file.
if __name__ == '__main__':
   unittest.main()
Using a command line, we navigate to the folder containing our files. Once in the same folder, we can run our tests using the command python test_my_sum.py.
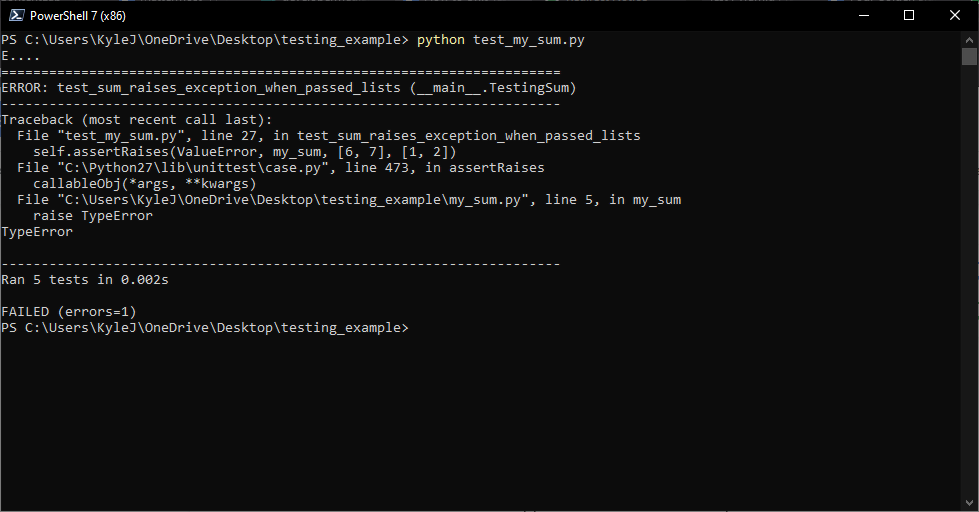
This instructs the command line to use Python to execute the test_my_sum file, where it hits our entry point and is then told to use the unittest test runner. A similar way to run this test file from the command line is to use the python -m unittest test_my_sum command as pictured below.
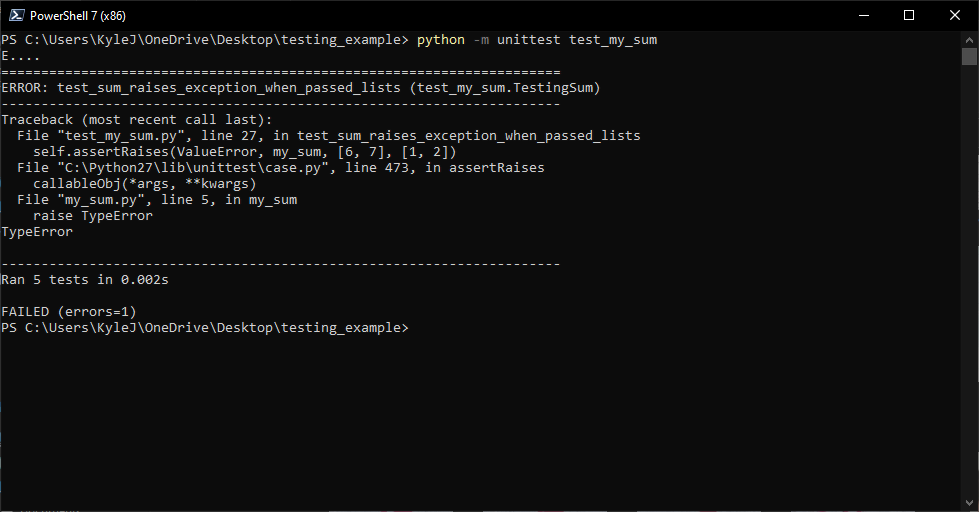
As shown in these screenshots, some text will be returned to the command line giving you information about the test results. The first line will show which tests have failed or passed using a full stop (.) to denote passing tests and E or F to show which have errored or failed. We’ll also be given a stack trace for each failing test that explains why each test hasn’t passed.
Running Unit Tests in an IDE
These unit tests can also be executed from within your favorite integrated developer environments (IDEs), like PyCharm or Visual Studio. This makes it more convenient when working with large projects that include many files.
Running Unit Tests in Visual Studio Code
To run tests in Visual Studio Code, you will need to configure the Visual Studio Code to work with the test framework. To do this, we open the Testing tab on the sidebar menu.
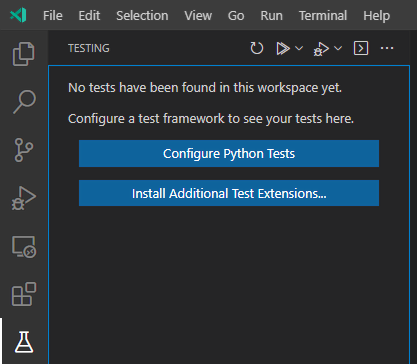
A menu resembling the one above should appear. Click on the button labeled Configure Python Tests. A dropdown menu will appear at the top of the screen. From here, select unittest.
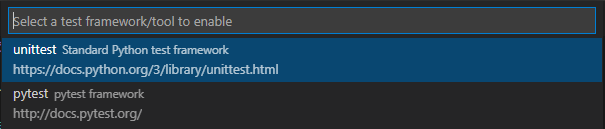

Next, click on the option that is labeled with the directory of the tests. In this tutorial, this is the root directory that’s labeled with a full stop (as shown above). The next set of options asks which naming pattern we’ve used for our test files. For this tutorial, the option we will select is test_*.py.
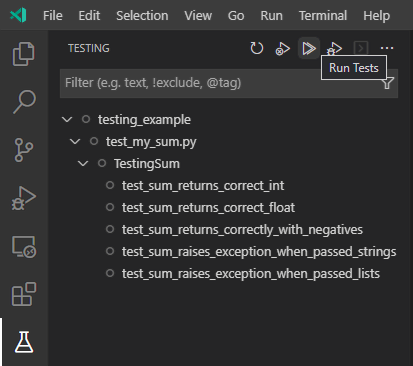
Our test runner should now be configured correctly, meaning that our tests will show in the Testing menu on the left. From here, the tests can be run by clicking the Run Tests button.
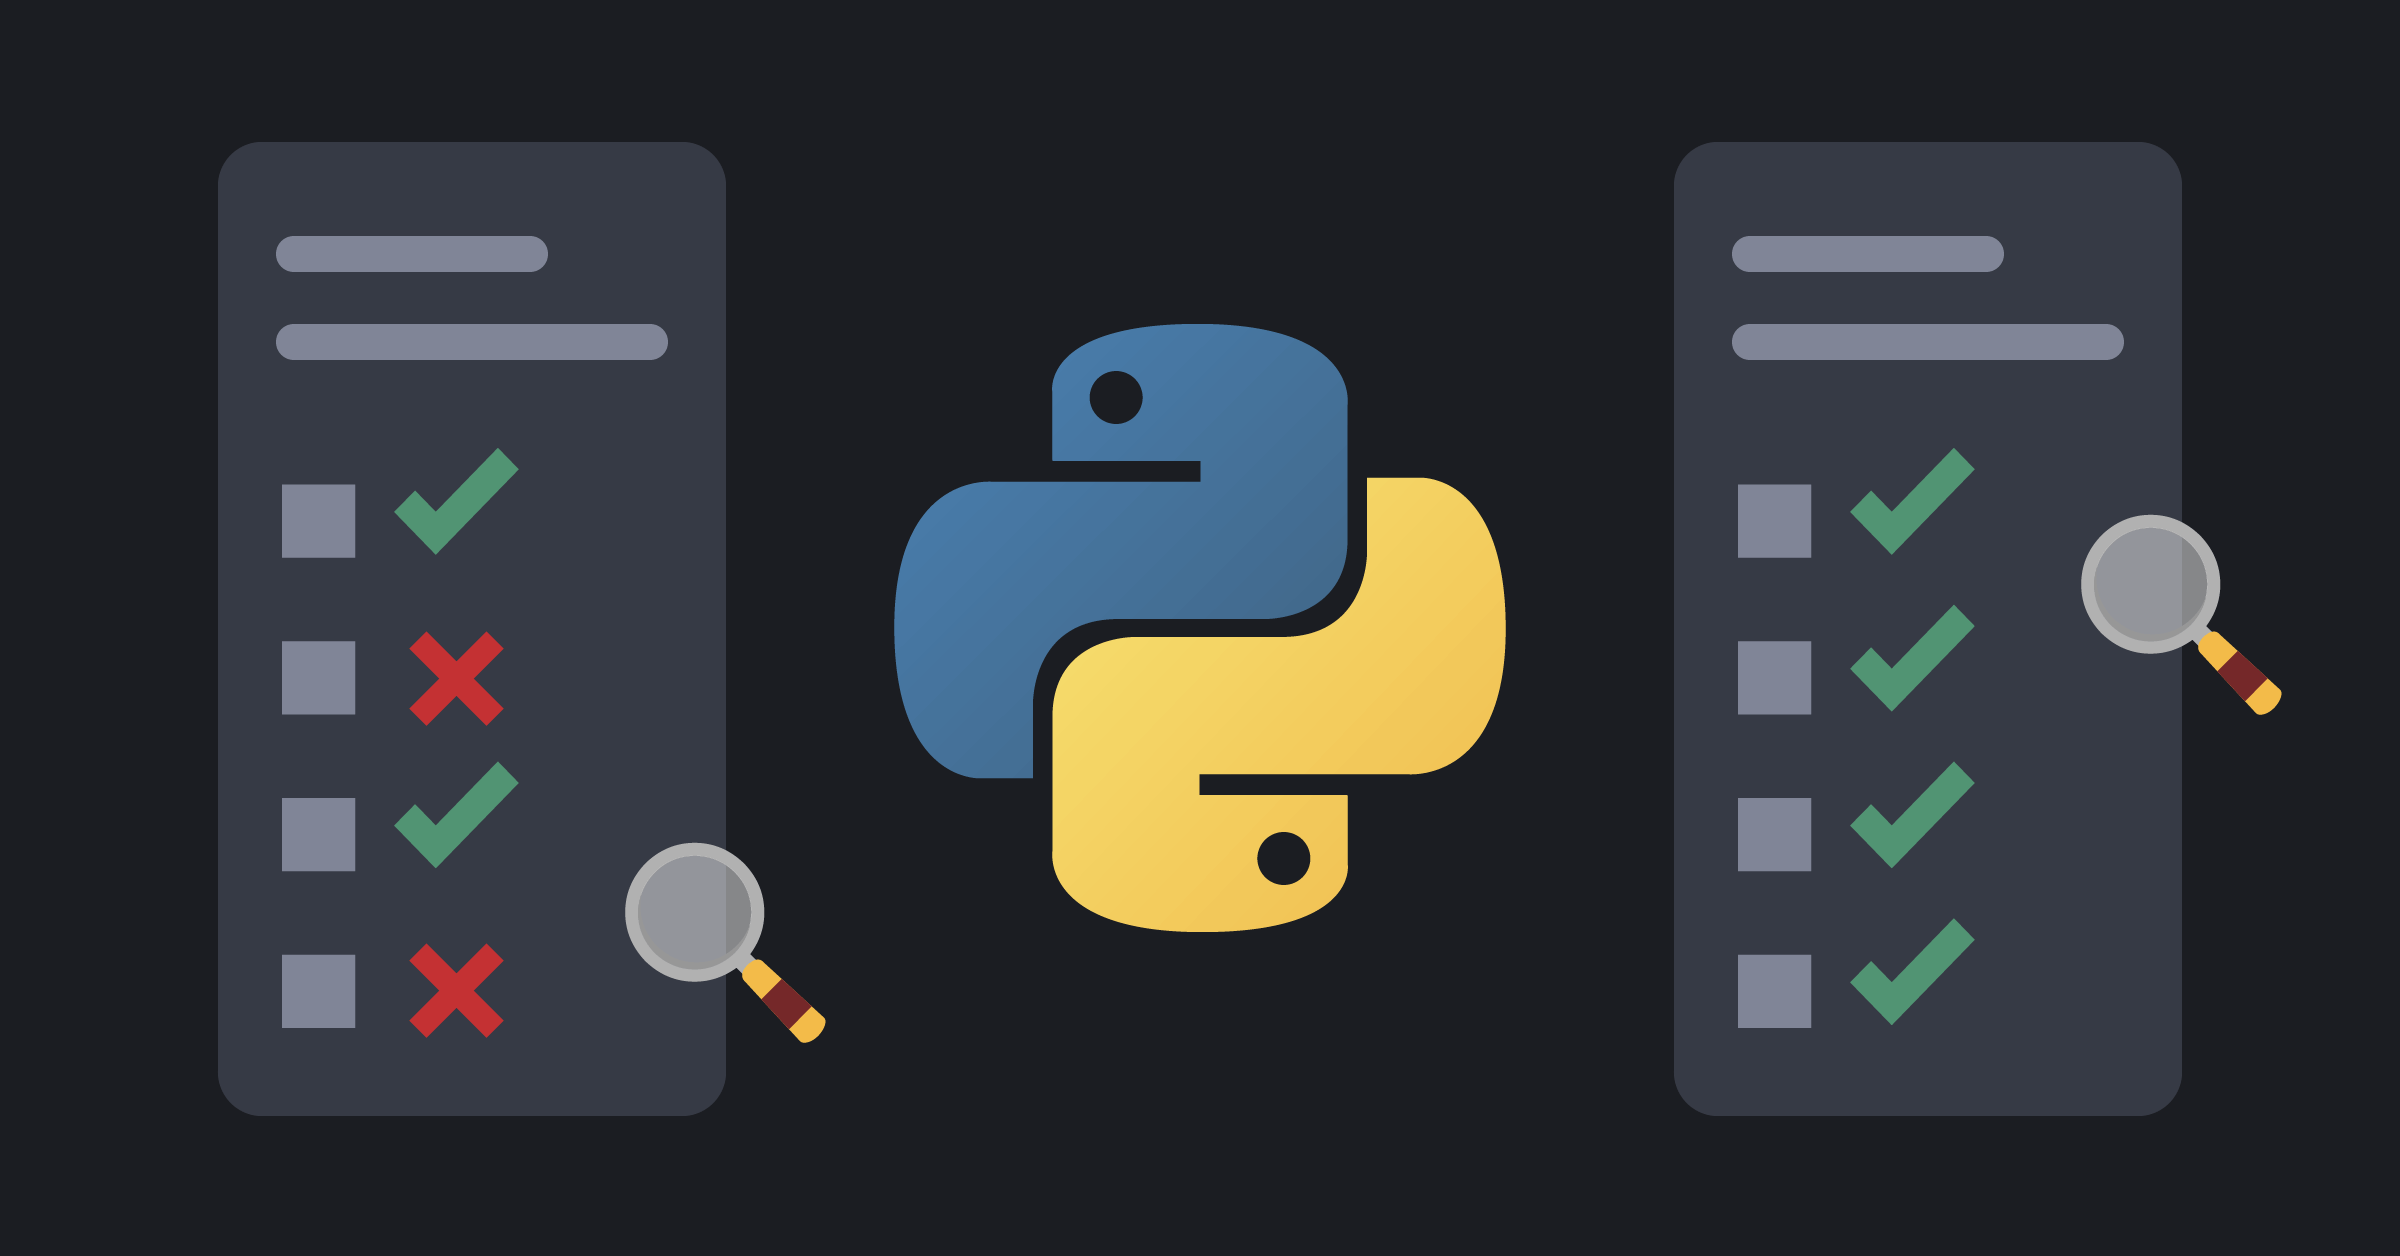
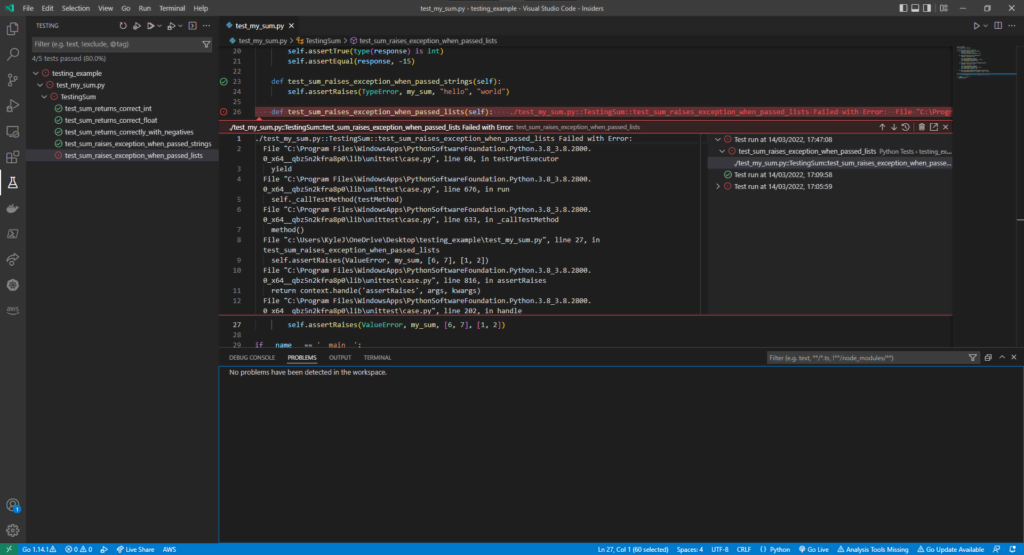
Any passing tests will show up with a green tick, whereas the failing tests will have a red cross. The screenshot below shows an example of both.
Setting a Strong Foundation with Unit Tests
Unit testing is a vital element in the testing pyramid. Testing isolated features and functionality is important as they are often the fastest to build and run. This means that a large testing suite can be completed incredibly quickly to confirm all requirements and acceptance criteria are being met. To instill confidence in our projects from the very start, unit tests should be written before any functional code.
This blog post was created as part of the Mattermost Community Writing Program and is published under the CC BY-NC-SA 4.0 license. To learn more about the Mattermost Community Writing Program, check this out.


