
How to Break Stuff with Chaos Engineering and Chaos Mesh
In 2011, a Netflix engineering team introduced the concept of chaos engineering with its release of Chaos Monkey. This was initially an in-house tool developed to orchestrate fault injection that Netflix eventually made open source. However, the reliance of Chaos Monkey on Spinnaker, another Netflix engineering innovation, establishes some limitations.
As a result, several other tools have entered the fray of chaos engineering. Chaos Mesh and Litmus excel in targeting a specific workload scenario, such as a Kubernetes cluster. Other solutions like Gremlin offer chaos engineering as a managed service, allowing for a broader target environment, such as virtual machines (VMs). Moreover, they can target the application layer regardless of the underlying hypervisor in use.
In this article, we’ll explore how to use Chaos Mesh to deploy and perform chaos engineering-based fault injection simulations against a Kubernetes cluster. As an open source tool backed by the Linux Foundation, Chaos Mesh doesn’t require a license for use. So apart from installing the Chaos Mesh binaries, we won’t need any other tools to orchestrate the testing.
- Prerequisites to using Chaos Mesh
- Validating Kubernetes setup using Kubectl
- Installing Chaos Mesh
- Accessing the Chaos Mesh dashboard
- Creating chaos experiments
- Using chaos engineering to improve system performance
Prerequisites to using Chaos Mesh
To follow along with this article, ensure you have the following prerequisites:
- Administrative access from kubectl to a running Kubernetes cluster environment. Chaos Mesh supports several scenarios, including a Kubernetes-native setup, Minikube, and MicroK8s. It also supports public cloud Kubernetes scenarios like Microsoft Azure AKS, Amazon AWS EKS, and Google GCP GKE.
- A running sample service application in the Kubernetes cluster based on a few pods. The above links typically provide a sample application you can deploy using kubectl YAML templates.
Validating the Kubernetes Setup Using Kubectl
To ensure that the Kubernetes setup is ready for Chaos Mesh, let’s start by validating the access authorization, the Kubernetes namespace, and the Kubernetes pods runtime.
First, initiate the following kubectl command to validate administrative access to your Kubernetes cluster and list all the current namespaces. If you don’t yet have a cluster running, you can use minikube to bring one online. Note that your project will look different, as the sample is running multiple namespaces:
kubectl get namespaces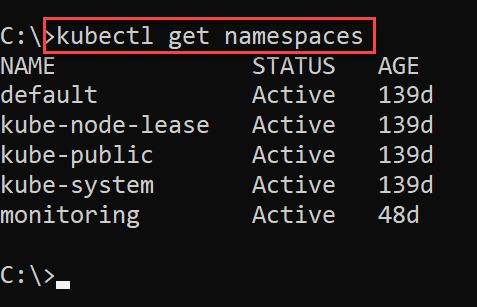
Next, initiate the following kubectl command to validate the running pods within the target Kubernetes namespace. Replace default with whatever you’ve called your namespace:
kubectl get pods --namespace default
This confirms successful access to your Kubernetes environment.
Installing Chaos Mesh
As previously mentioned, Chaos Mesh only requires installing its toolset. You can use a Helm package install:
helm repo add chaos-mesh https://charts.chaos-mesh.org
helm repo update
kubectl create ns chaos-testing
helm install chaos-mesh chaos-mesh/chaos-mesh --namespace=chaos-testing --set chaosDaemon.runtime=containerd --set chaosDaemon.socketPath=/run/containerd/containerd.sock
The first two Helm commands add the Chaos Mesh package and check for updates. Then, the kubectl create command creates a new namespace for Chaos Mesh to run. Its default name is chaos-testing, but you can name it anything you’d like.
The final Helm command then runs the package installation.
Alternatively, you can do this by running an install.sh script:
curl -ssl https://raw.githubusercontent.com/chaos-mesh/chaos-mesh/master/install.shhttps://mirrors.chaos-mesh.org/v2.2.0/install.sh | bashDepending on your Kubernetes platform characteristics (Docker, Containerd, K3S, and so on), you may need to change the chaosDaemon.runtime flag to another runtime. See Step 4 of this Chaos Mesh documentation for details.
Now, let’s validate the newly created chaos-testing namespace for running pods by performing the following command:
kubectl get pods --namespace chaos-testing -l app.kubernetes.io/instance=chaos-mesh
This confirms the successful installation of the chaos-mesh daemons using Helm.
While Chaos Mesh remains a powerful integration when using kubectl with YAML files, it also provides a specific pod (chaos-dashboard-xyz123) that enables interaction and configuration tasks from your browser.
Accessing the Chaos Mesh Dashboard
To load the Chaos Mesh dashboard, initiate the following port-forward command:
kubectl port-forward -n chaos-testing svc/chaos-dashboard 2333:2333
You can now navigate to https://localhost:2333/dashboard in your browser to see the dashboard. Since we used Helm to install Chaos Mesh, it enables dashboard security mode, requiring us to create and enter an authentication token to access the chaos-testing namespace:
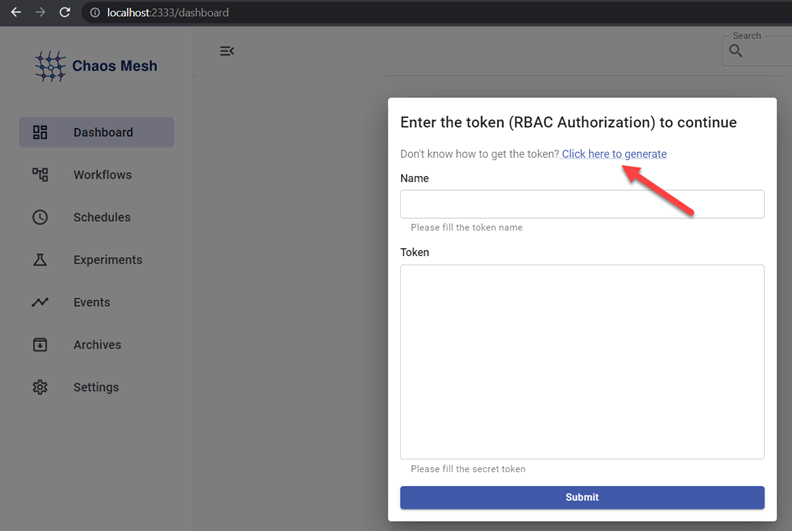
Select Click here to generate and follow the three steps.
Step 1 initiates the required YAML file for the RBAC permissions. Ensure you specify the chaos-testing namespace and set the Role to “Manager.”

Your sample YAML file will look similar to this:
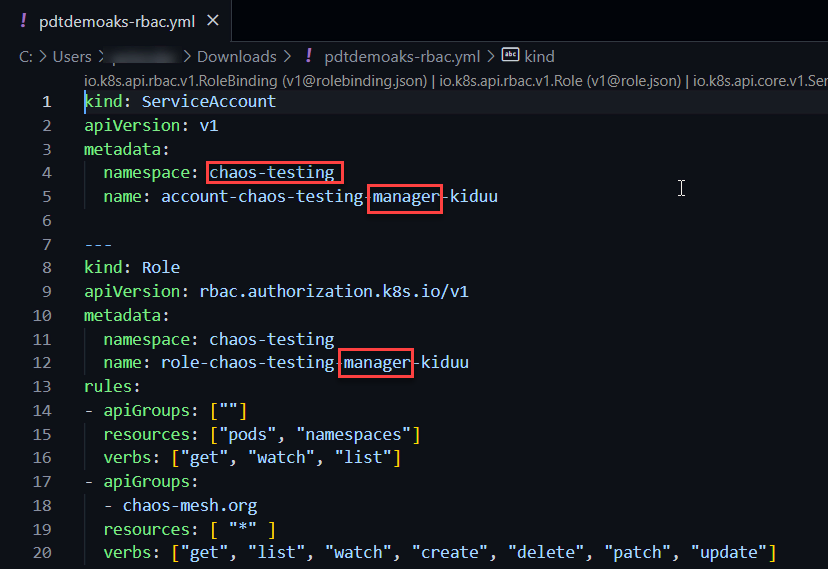
Now, save the file to your local machine as <kubclustername>-rbac.yaml and run it as follows:
kubectl apply -f <path to yml-file>/pdtdemoaks-rbac.yml
Next, generate the RBAC token by triggering a kubectl describe command and replace the account name (kiduu) accordingly:
kubectl describe -n chaos-testing secrets account-chaos-testing-manager-kiduu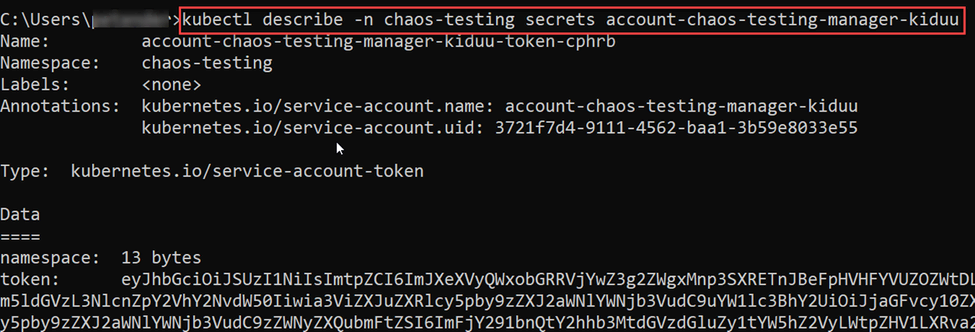
Copy the resulting token into a separate text file, as you’ll need it. You’ll also need the account name, seen in the dashboard popup window. In the screenshot above, this name is account-chaos-testing-manager-kiduu-token-cphrb.

Now we have manager-level permissions to start our Chaos Mesh experiments.
Creating Chaos Experiments
A chaos experiment injects the failures you want to initiate and run against the Kubernetes environment. These failures can include stopping a pod, performing load simulation, including CPU, memory, and network latency, and several others. We can create chaos experiments using a YAML file and kubectl or by configuring them from the Chaos Mesh dashboard.
There are two types of chaos experiments. The “one-time” experiments allow you to execute an immediate fault injection, while the “scheduled” or “cyclic” experiments allow you to repeat fault injection simulations based on scheduled tasks (using CRON syntax).
Let’s start by creating a one-time experiment:
First, from the Chaos Mesh dashboard, navigate to Experiments and click New Experiment.
Then, from the portal, select the following settings:
Experiment Type: Kubernetes

Pod Fault: Pod Failure

Next, navigate to Experiment Info and configure the following settings:
- Namespace Selectors: This is the target namespace where your application pods are running.
- Name: Provide a unique name for the test.
- Duration: Choose any duration measured in seconds (for example, 600s reflects 10 minutes).

Although we won’t use Mode settings in our testing, they provide some interesting options, such as running a random one-off test and triggering a fixed number or percentage. This allows for more granularity in testing.
Now, click the Submit button and wait for the experiment to run.

While this experiment is running, let’s trigger a scheduled one. Navigate to Schedules in the left menu and select New Schedule.
Repeat the settings for Experiment Type—or try out some other scenarios—and provide the necessary settings for the other fields as in the previous experiment.
The scheduling is based on a CRON job syntax, which might represent the most challenging part of this configuration. Depending on the details of our schedule, there are several different combinations possible. For example, running this test every night at midnight would have the following notation:
0 0 * * *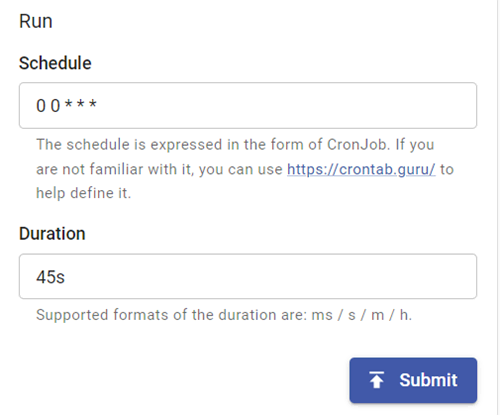
Confirm the scheduled job by pressing the Submit button.
Chaos Mesh also allows us to create experiments using YAML syntax. Note how the portal helps in the creation of the syntax. For example:
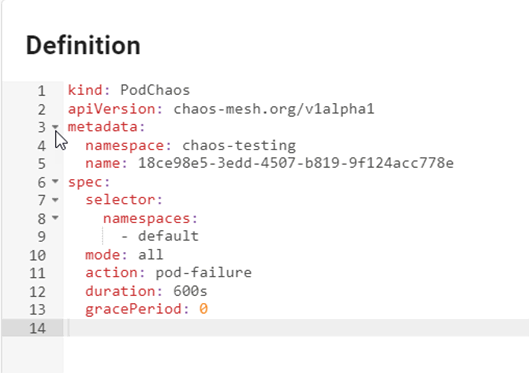
We can then run this YAML-based experiment using the kubectl apply command:
kubectl apply -f <path to PodChaos.yaml>Monitoring Chaos Mesh Experiments
The dashboard is one of the easiest ways to interact with Chaos Mesh experiments. Navigate to Dashboard in the left menu:
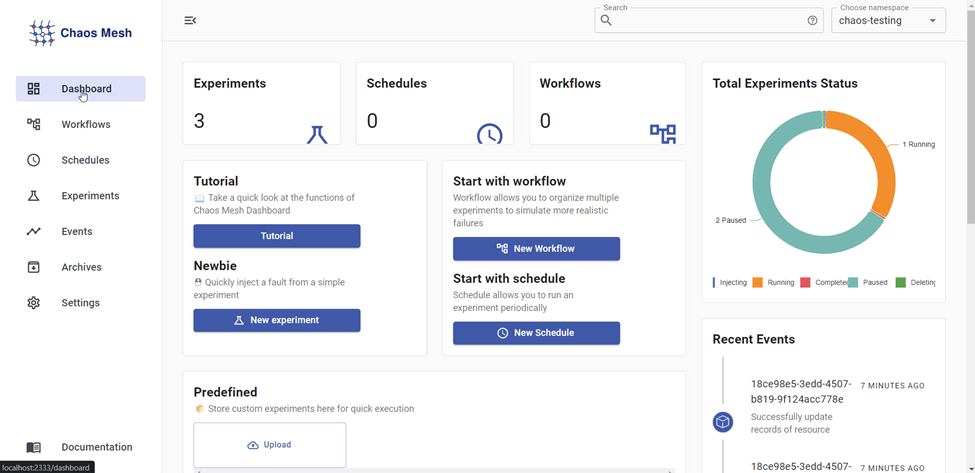
This provides an overview of defined experiments and schedules, as well as a “total experiments status” overview in a pie chart that clearly identifies the current state of all experiments.
Any defined experiment that has already been executed will be moved to a paused state:

Additionally, we can validate the impact of the testing from kubectl:
kubectl get pods --namespace default
As we can see, several of the sample application pods have restarted throughout the various executed experiments. At the same time, we should confirm the reliability and availability of the application workload while performing the fault injections.
Final thoughts: Using chaos engineering to improve system performance
While the impact in this sample scenario might be limited, consider the core concept of Chaos Engineering: initiating failures against your production environments. Chaos Mesh doesn’t know whether our target environment is production. Therefore, it’s recommended to run chaos testing in your development and testing environments and to study the data and outcomes this testing produces. Testing in this manner allows for more detail-oriented testing, such as stopping a node, simulating network latency, and generating CPU or memory usage spikes.
In this article, we explored how to use Chaos Mesh as a chaos engineering solution for Kubernetes clusters. Even with the degree of testing complexity that Chaos Mesh offers, using it to manage and execute experiments remains as simple as the demonstration we’ve just completed. Learn more about setting up, managing, and optimizing Kubernetes environments on the Mattermost blog.
This blog post was created as part of the Mattermost Community Writing Program and is published under the CC BY-NC-SA 4.0 license. To learn more about the Mattermost Community Writing Program, check this out.


