Everything You Need to Know about K3s: Lightweight Kubernetes for IoT, Edge Computing, Embedded Systems & More
If you are a vivid traveler of the tech universe, you’ve likely come across this term: Kubernetes.
Scratching your head? Let me make it clear: In simple terms, we know Kubernetes — or K8s — as a portable and extensible platform for managing containerized workloads and services. It can facilitate both declarative configurations as well as automation. It also holds a tremendous advantage as it is entirely open source and has a large and rapidly growing ecosystem along with the wide availability of its tools, services, and support.
While Kubernetes is still in the limelight for managing workloads in the cloud, it can’t cope with spinning clusters in a machine with low requirements.
To solve this issue, lightweight Kubernetes — or K3s — came into the picture.
In this article, we’ll look at a little bit of everything on K3s. Let’s begin!
History of K3s
K3s is an open source and lightweight distribution of Kubernetes, engineered and packaged in a binary of less than 100 MB in size (about 40 MB) with 250 MB of memory consumption. It was officially released on Feb. 26, 2019.
Rancher started K3s as an embedded component of Rio, which was one of their experimental projects. But when they saw an actual demand for Kubernetes on edge and also a demand for K3s itself, they decided to fork it out of Rio and release it as a separate open source project.
K3s is really efficient and high in performance. In particular, K3s has had success with IoT, edge, ARM, CI, development, and embedded systems use cases.
And the best part? We can install K3s as a single node and as a multi-node cluster, and it will be a fully conformant, production-ready Kubernetes distribution.
Now that you have a high-level understanding of K3s, let’s dive into the architecture.
K3s architecture
In this section, we will briefly discuss the architecture that constitutes K3s. But first, here’s a picture of what it looks like:
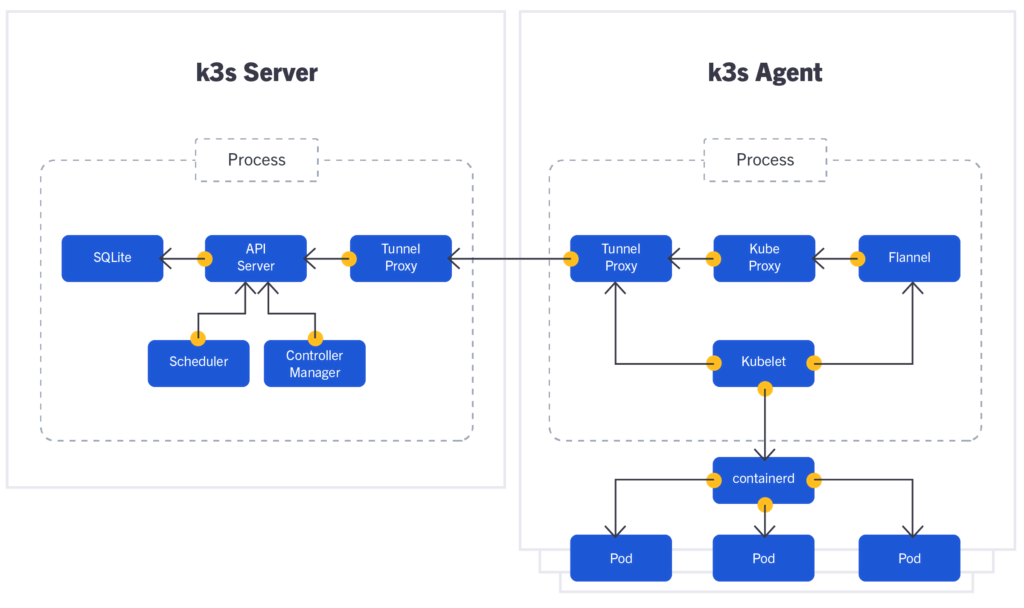
This image shows that K3s architecture consists of a server and an agent — similar to a master node and a worker node available in K8s. We can see that the server and agent connect through a proxy named Tunnel Proxy. Communication is always done from the agent that sets up the tunnel. A lot of communication occurs between the server and the agent, but appropriate ports and connectivity are set up through the tunnel.
In general, Kube Proxy uses several ports to get connected with API-Server. But in the case of K3s, we can see that Kube Proxy gets connected with API-Server with the help of Tunnel Proxy. Tunnel Proxy creates a unidirectional connection to reach out to API-Server. Once it establishes the link, bidirectional communication is established, making a more secure connection by using a single port for communication.
In K3s, we can already see the new addition of SQLite. It’s the replacement of ETCD, which is used in K8s. K3s aims at removing dependency from ETCD by allowing the exclusive running of a single-node cluster with SQLite. In the case of a multi-node cluster, K3s uses external databases.
We also see Flannel in the agent, which works as a container network interface (CNI) for cluster networking in K3s. In the picture, we can see Flannel has a connection with Kubelet, which again connects with Containerd. Containerd is also a new addition that establishes connections with multiple pods in K3s.
The components of K3s and their functionalities are somewhat similar to that of K8s except for SQLite, Tunnel Proxy, and Flannel — which are all new additions. Here in K3s, all of the components run together as a single process which makes it really lightweight. That’s compared to K8s, where each component runs as a single process.
Since both the server and the agent can run as a single process in a single node, we can spin up a single node cluster in about 90 seconds thanks to the architecture of K3s.
K3s vs. Kubernetes
While K8s and K3s offer similar functionality, they also have a fair share of differences.
For starters, we see the removal of legacy and non-default features along with the alpha features that aren’t ready for primetime; Rancher even stated that they had removed almost 3 billion lines of code.
You won’t find in-tree cloud providers in K3s because some organizations can use single or multiple cloud providers based on their requirements, and since many are using Kubernetes on-prem, they don’t use cloud providers. Also, in the edge, teams might not need cloud providers. Even so, you can install them as add-ons if you need to.
We can also see the exclusion of in-tree storage drivers. And lastly, K3s removed its reliance on Docker. However, we can still use Docker as an option if we want.
What was added? First and foremost, simplified installation. Now, we don’t have to wait an extended amount of time for a cluster spin-up. Instead, we can get a single node cluster up and running in about 90 seconds.
K3s also enables you to use SQLite3 as the database for Kubernetes. Now, K3s will do all the TLS management for us. Also, we get an automatic manifest and Helm chart management. This will allow us to drop a YAML file into a directory, and K3s will scan that directory and automatically pick up the file and run it through the Kubernetes process — functionality that will be very beneficial for the edge. Lastly, we can also see the addition of Containerd (which came in as a replacement for Docker), CoreDNS, and Flannel.
K3s Advantages
At this point, you’re familiar with the differences between K8s and K3s. Now, let’s take at some of the advantages K3s delivers:
Quick installation: One of K3s’ main advantage is simple installation. You can get your K3s server installed in about 90 seconds.
Small size: K3s is less than 100 MB in size, making it flexible to run on any device with low requirements (e.g., IoT and edge use cases).
Automatic manifest: K3s also offers the considerably advantage of automatic manifest, which will be particularly beneficial in edge computing.
Adding and removing nodes: We can easily add and remove nodes from a K3s cluster by executing one-line commands. It’s quick and simple.Easy cluster configuration: We can easily set up a single node or multi-node cluster, without any complexity.
How to use K3s
The benefits of K3s speak for themselves. But how exactly can we put them into practice? Let’s take a look.
Before you get started, make sure you have the right software and hardware setup to support K3s.
Cluster setups in K3s
Setting up clusters, be it a single node or multi-node in K3s, is really easy. We can set up a single node cluster in a single command, and we can set up a multi-node cluster in roughly three commands. In other words, we don’t have to wait a considerable amount of time to spin up a cluster like we do with K8s.
Single-node cluster
Spinning up a single node cluster in K3s or setting up a K3s server is not a tough nut to crack. Instead, it’s a piece of cake. Run the following command in your terminal to set up a single node cluster:
curl -sfL https://get.k3s.io | sh -s - --write-kubeconfig-mode 644Note that there’s an extra flag in this command: --write-kubeconfig-mode. This is because the kubeconfig file is only readable for the root user, and we have to make it readable for other users as well.
Congratulations! Your cluster is now ready.
Multi-node cluster
Setting up a multi-node cluster in K3s is also very easy. Follow three simple steps to set up a multi-node cluster.
Step 1: In the first step, we have to run the same command used to set up a single node cluster to create the K3s server:
curl -sfL https://get.k3s.io | sh -s - --write-kubeconfig-mode 644Step 2: In the second step, we have to run the following command to find the node-token, which the K3s agent will use to add as many worker nodes as we want to our cluster:
sudo cat /var/lib/rancher/k3s/server/node-tokenPlease note the “master node IP” and “token” since we’ll need them next.
Step 3: In the last step, we’ll create a K3s agent for the master node. To make a worker node for the master node that we’ve already created, we have to execute the following command in a separate instance:
curl -sfL https://get.k3s.io | K3S_URL=https://my-server:6443 K3S_TOKEN=node-token sh –Note: We have to replace “my-server” with the server IP, and “node-token” with the master node token noted earlier.
Congratulations! We’ve successfully set up a multi-node cluster.
Best use cases for K3s
K3s — or lightweight Kubernetes — has a vast number of use cases.
It’s widely used in edge computing, embedded systems, and IoT devices. Due to the small package and fewer requirements of K3s, we can have efficient support on a Raspberry Pi. When it boils down to it, K3s is extremely useful for making single app clusters. It also has good usability with continuous integration environments.
One of the myths I’ve encountered during my research is that K3s can only support small devices like Raspberry Pis due to its small size and low requirements.
That’s not true.
Due to the easy configuration and flexible nature of K3s, it can support an AWS ai.4xlarge 32GB Server!
Should I use K3s?
In this article, we’ve covered the whole of K3s, including history, architecture, advantages, use cases, and myths. It’s been a wholesome journey.
Now, you’re probably asking yourself this question: Should I use K3s?
It depends on your needs. Whatever they are, it won’t hurt to play with this free and open source project.
So, what are you waiting for?
Get your hands dirty, and stay tuned for the next tutorial.
This blog post was created as part of the Mattermost Community Writing Program and is published under the CC BY-NC-SA 4.0 license. To learn more about the Mattermost Community Writing Program, check this out.