
How to Build a Basic API with Python Flask
Application programming interfaces (APIs) have made developers’ lives much easier and almost every developer has used APIs at some point. This article deals with the process of creating an API in Python using Flask. The theory of APIs, requests, responses, and methods are covered first before moving into a code-based hands-on example that will show you how to create an API. The code referenced in this article has been made open source and is available on GitHub; you can find the link to the repository at the end.
After reading this article, you should be able to describe how an API functions, explain what routes and status codes are, and understand the JSON format. This article also includes a hands-on section where you’re encouraged to code along to create your own full-fledged API.
To follow this guide, you’ll need basic experience with Python and working with data structures such as lists and dictionaries. This guide will use Pipenv for the development environment, but you’re free to use any virtual environment library you’re most comfortable with (or none at all).
Let’s begin!
The basic components of an API
APIs are the intermediary layer that allows applications to communicate with each other. Nowadays, whenever we need to sign up and create an account somewhere, we very conveniently choose options such as “Sign in with Google” or “Sign in with Apple.” Without knowing how user authentication is being done behind the scenes, we get logged in. This is a common use case of APIs.
To help you understand how APIs work, let’s look at a real-world comparison.
When we visit restaurants, we never go up to the kitchen and ask the chef to take our order, although he or she will ultimately prepare our food. Instead, we tell waiters and waitresses what we want.
The two basic tasks of a waiter are taking an order and delivering it to the cook and then taking the prepared food from the kitchen to the customer. In this light, a waiter’s job description fits perfectly into how an API works. The API takes in some data from the user as an input and delivers it to the system. After that, the data is processed and an output is obtained, which is then given back to the user via the API.

This example will be used throughout the article, and in the hands-on section, we’ll build a full-fledged restaurant API using Flask.
Now that you have a better idea of what an API does, let’s take a peek under the hood and look at the major components that make up one.
HTTP methods
HTTP — or Hypertext Transfer Protocol — is a protocol that facilitates communication between web servers and clients. It’s a request-response protocol; the client sends a request to a server and the server sends back a response to the client. HTTP provides the following seven methods for requests: i) GET ii) POST iii) PUT iv) DELETE v) HEAD vi) PATCH vii) OPTIONS. Of these seven, the first four methods are the most common and will be the subject of our discussion.
1. GET
The GET method is used to request data from a server. Whenever you want to get a response from a server, you’ll use this method. In our restaurant example, the GET method is illustrated by asking the waiter for the menu, who will then provide it in response.
2. POST
The POST method is generally used to send data to a server, which is then used to update or create resources. In the restaurant, POST occurs when we choose items and give our order to the waiter. We can also change the quantity of any item ordered if we so choose.
3. PUT
The PUT method is similar to the POST method; the only difference is that the result stays the same when the same resource is passed. For example, imagine we want to update the restaurant’s menu with a new item. If the item exists, then the menu remains the same. If it doesn’t, the menu gets updated.
4. DELETE
As the name suggests, the DELETE method is used to remove a resource. In the restaurant, an example could be removing an item from the menu.
Keep in mind that these methods can be used in tandem as well. Say we order an item and want the waiter or waitress to confirm that the item was added. The POST method would take care of the ordering part while the GET method will facilitate the confirmation.
Another term in the field of APIs worth pointing out is REST APIs or RESTful APIs. Simply put, REST is an architectural structure that uses HTTP methods to POST and GET data.
Routes, status codes, and responses
Routes are the paths or URLs through which users can interact with an API. Routes are normally given meaningful names. In the event you were going to ask the waiter to show you the menu, you might use a route called /showmenu for the task.
Before getting hands-on, you need to also be aware of status codes. At the restaurant, a waitress might say “This item isn’t available” or “I have added this item to your order.” In other words, status codes specify whether a request has been successfully carried out — which makes them particularly handy during testing.
The status codes used in this article and their meanings are found in the table below.
| Status code | Meaning |
| 200 | The request has succeeded. |
| 201 | Request succeeded; a new resource has been created. |
| 400 | Bad request; the server won’t process it due to a client error. |
| 404 | Resource not found. |
The response in most APIs is in JSON (JavaScript Object Notation) format, which is quite similar to the dictionary data type in Python. Thus, JSON is a set of key-value pairs. Imagine you went to a restaurant and ordered rice and mutton. A sample JSON response would look like this:
{
   "your_orders": [
       {
           "item": "Rice",
           "price": 10,
           "quantity": 1
       },
       {
           "item": "Mutton",
           "price": 25,
           "quantity": 1
       }
   ]
}
How to use cURL to test APIs
cURL is a command-line tool that can be used to transfer data to and from a server. At a very basic level, cURL lets you talk to a server by specifying its location in the form of a URL.
In this piece, we’ll use the cURL command to send requests to the API and verify whether it’s working well. We’ll also use a variety of flags to specify the requested HTTP method, the type of content we want to send, and the content we’re going to send, among other things.
The --request flag specifies the HTTP method for the request, with the URL where that request will be made also mentioned. To test the GET request for the route /showmenu, the cURL command would look like this:
curl --request GET https://127.0.0.1:5000/showmenu For the other requests, we need to send data. As mentioned earlier, we’ll work with JSON. To specify the type of data, we use the -H flag, which stands for headers. The -d flag is used to pass the data. A sample POST request will look like this:
curl -H "Content-Type: application/json" --request POST -d '{"id":2}' https://127.0.0.1:5000/ordersThe PUT and DELETE requests would look similar as well, with only the --request flag changing.
Hands-on: Build a restaurant API
Now that we have the foundational knowledge of APIs, requests, and responses, we can begin building an API ourselves. First, let’s define our problem statement.
We want to build an API for a restaurant, which will achieve the following tasks for us:
- Show the menu.
- Take our order from the menu.
- Show us what we ordered.
- Add an item to the menu (staff only)
- Remove an item from the menu (staff only)
The main aim of this article is to help you build your own APIs — the way you want. I’ve tried to keep the code simple and understandable — e.g., by using lists and dictionaries instead of a database.
Before we get started, you need to open up a new folder and name it whatever you want. I named it flask-api. Once you’ve done that, open up a terminal and navigate to the folder you just made.
Set up your environment and initialize the menu
Creating virtual environments is one of the best ways to work on projects. In this article, we’ve used pipenv for this purpose.
To install pipenv, type pip install pipenv in the terminal, and the installation process will commence. Next, activate the virtual environment, by typing pipenv shell.
If successful, you should see output that indicates that you’ve launched a new virtual environment. All commands you run from this point on should be run inside this virtual environment.
We’re almost done setting up our project. The only step left is to install the required modules. The best way to do this is by storing all the relevant modules in a file, requirements.txt, from where all the modules can be installed by just giving the command — pip install -r requirements.txt — in the terminal.
Since I’ve already installed it, running the command shows Requirement Already Satisfied. The contents of the requirements.txt file are as follows:
Flask
flask-cors
requests
pylint
Sometimes, the version of the package to be installed is also mentioned with the name of the package. At this point, we’ve basically installed Flask and its related packages for building the API.
Now that the project is set up, let’s dive into the code. We need to create a Python file where we’ll code up the API. In this piece, we’ve named it app.py. But first, we need to import the required modules, which we can do by initializing a Flask app:
from flask import Flask, json, jsonify
app = Flask(__name__)
Now, we have to define a menu. Since we’re not using any database, let’s go with a dictionary for each item, combined in a list for the whole menu. The orders list will be empty for now, since nothing has been ordered yet.
menucard = [{'Item' : 'Rice', 'Price':10},{'Item': 'Dal','Price':15},{'Item':'Chicken','Price':20},{'Item':'Mutton', 'Price':25},{'Item':'Fish','Price':20},{'Item':'IceCream','Price':10}]
orders = []
How to create basic API routes with Python Flask
Let’s now start creating routes. The first route is '/', which is basically like the homepage of a website. The syntax for creating a route is as follows:
@app.route('/route_name',methods=['GET'])
def function_to_execute_for_route():
'''Code to do the job '''
For now, we want the '/' route to simply return “Hello world!” The code looks like this:
@app.route('/')
def hello_world():
    response = jsonify('Hello world!')
    response.status_code = 200
    return response
The jsonify function converts our string to the JSON format. The status_code attribute is the HTTP status code we would want the API to return when this function is called. After this function, we need to specify that if this file is run, the app needs to be run, too. Adding the following lines will do the trick:
if __name__ == "__main__":
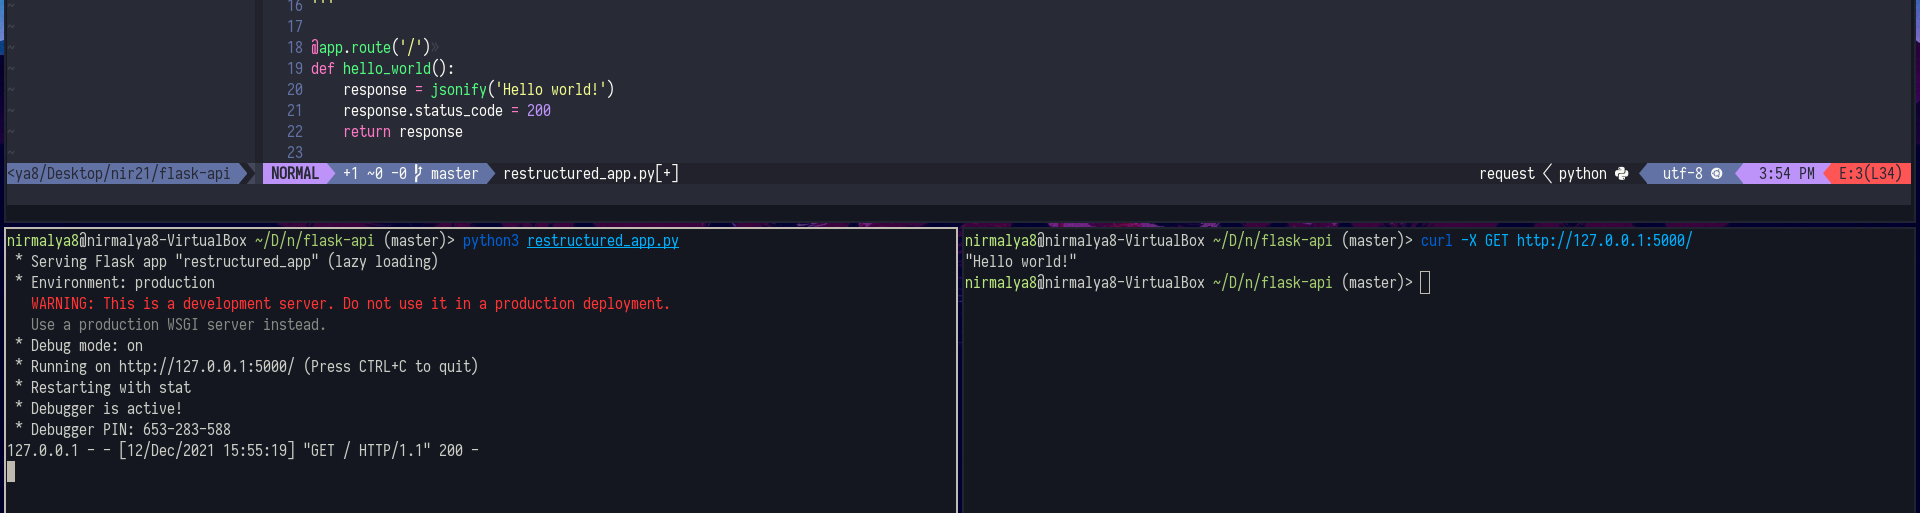
app.run(debug=True)All other routes need to be added before these two lines. To run this, you need to run the command python3 filename.py, which will give a link. In another terminal, let’s check whether our app is running fine. The cURL command to check this route looks like this:
curl --request GET https://127.0.0.1:5000/The output for this command appears in the image below. One thing to notice is that — on the terminal where the Python file was running — a log is being maintained with the request, the URL, and the response status code.
Hurrah! We’ve created an API. But, unfortunately, our API doesn’t do anything worthwhile.
So, we need to create more routes, which will add more functionality to our API.
Use GET requests to return data
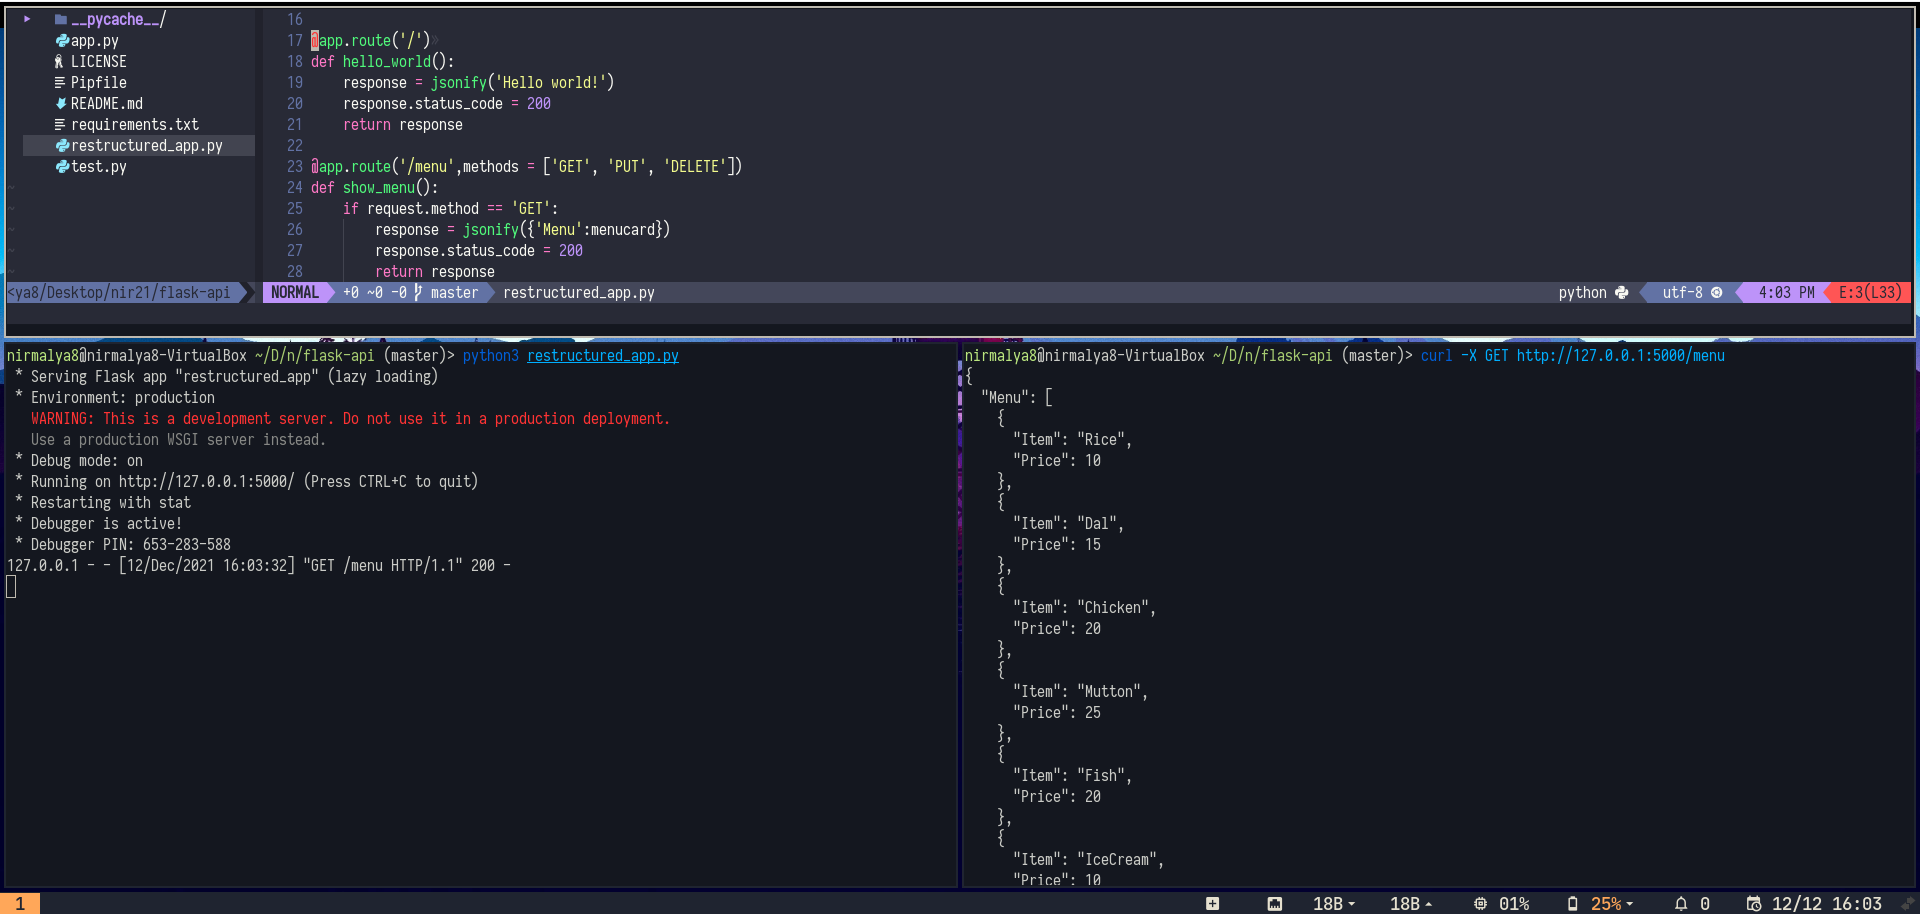
Let’s make a route to display the menu in JSON format. It will use the '/menu' route and the GET method, which is the default. We will also be able to use the PUT and DELETE methods for this route. The other routes will be added before the if __name__ == "__main__": line. The code looks something like this:
@app.route('/menu',methods = ['GET', 'PUT', 'DELETE'])
def show_menu():
    if request.method == 'GET':
        response = jsonify({'Menu':menucard})
        response.status_code = 200
        return response
Now, it’s time for you to write the cURL command for this route on your own. The output for this route is contained in the image below:
Time to pat yourself on the back again! But the main challenge lies ahead.
Use PUT and DELETE requests to modify and destroy data
We’ve mentioned two other methods for this route: PUT and DELETE. The next step is to move into the PUT request.
The PUT request will take in a JSON and add it to the menu if the item isn’t already present. Again, keep in mind that this is only for restaurant staff to use. If this were to be used in production, there would need to be some sort of authentication system in place — which is beyond the scope of this article.
# PUT Method to add an item to the menucard
    elif request.method == 'PUT':
        response = {}
        payload = request.get_json()
        item = payload["item1"]
        f = False
        for i in menucard:
            if i ==item:
                f = True
        if not f:
            menucard.append(item)
            response = jsonify({'Status': 'Added','Item':item})
            response.status_code =201
        else:
            response = jsonify({'Status': 'Already There','Item':item})
            response.status_code =400
        return response
The JSON data, which will be passed in the PUT request, will be of the same type as any of the items already in the menu. A sample cURL command for the same and its output is as follows:
curl -H "Content-Type: application/json" --request PUT -d '{"item1":{"Item" : "Curd", "Price":10}}' https://127.0.0.1:5000/menu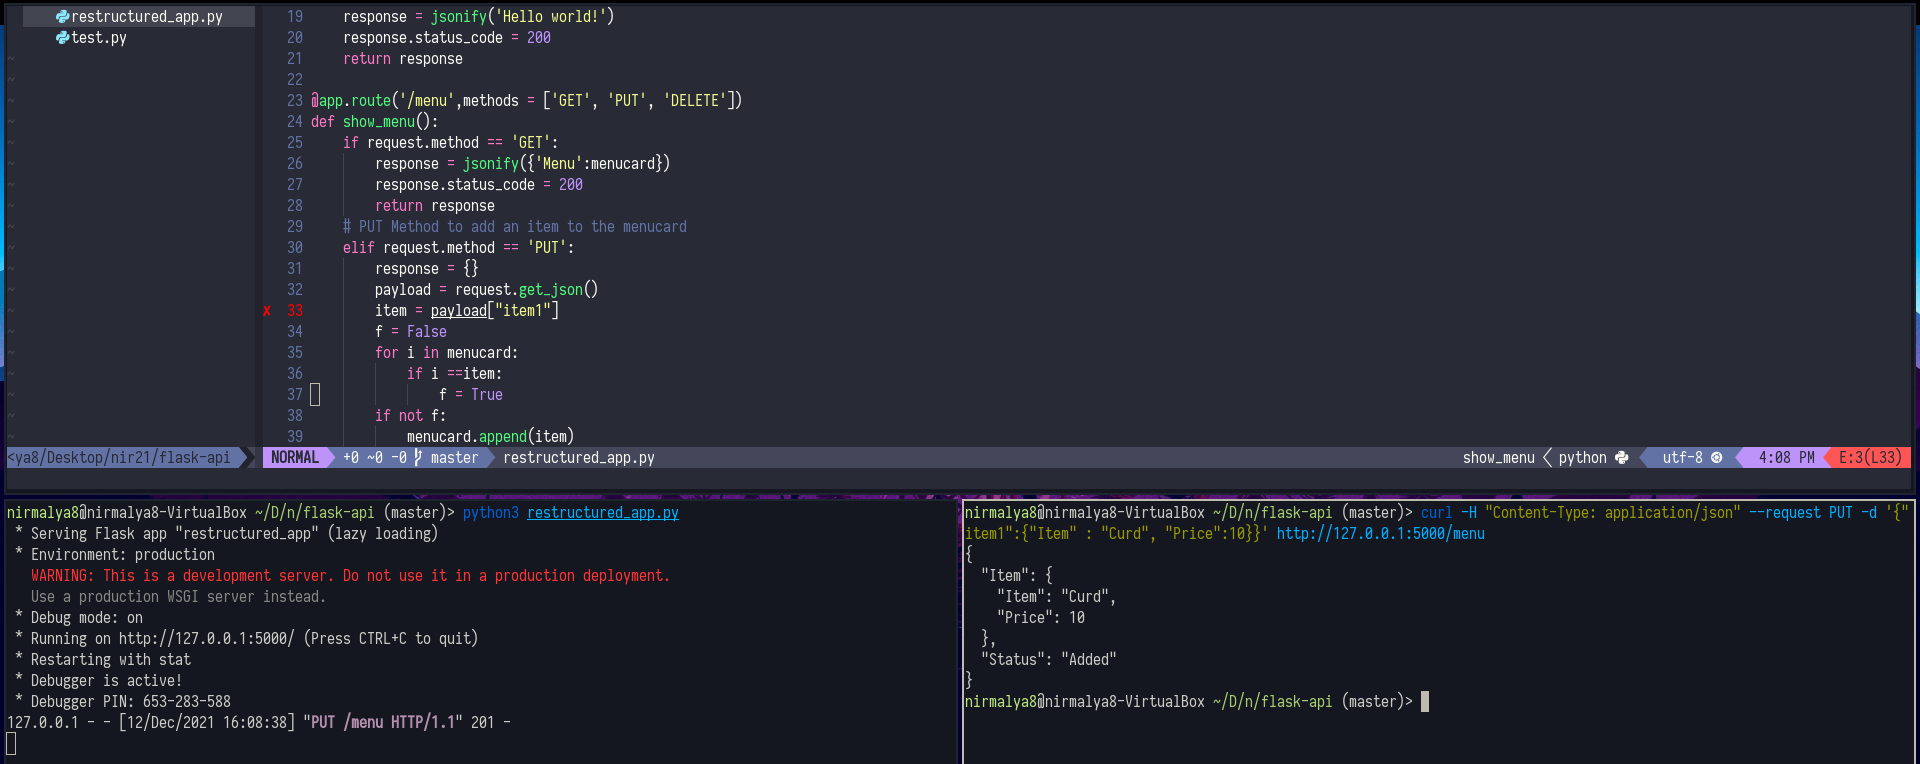
Next up is the DELETE request. The main goal of this request is to remove an item from the menu. Again, to make things simpler, we’ll use the index of an item in the menu as the ID. The following lines of code will help us achieve this goal:
#DELETE Method to delete an item from the menucard
    elif request.method == 'DELETE':
        response = {}
        payload = request.get_json()
        itemid = payload["id"]
        if itemid=0:
            item = menucard[itemid]
            del menucard[itemid]
            response = jsonify({'Status':'Deleted','Item':item})
            response.status_code = 200
            return response

        response = jsonify({'Status':'Not in Menu','ItemID':itemid})
        response.status_code = 404
        return response
This full code resides in the show_menu() function in if-elif blocks. The cURL command and the output for the DELETE request are shown below:
curl -H "Content-Type: application/json" --request DELETE -d '{"id":1}'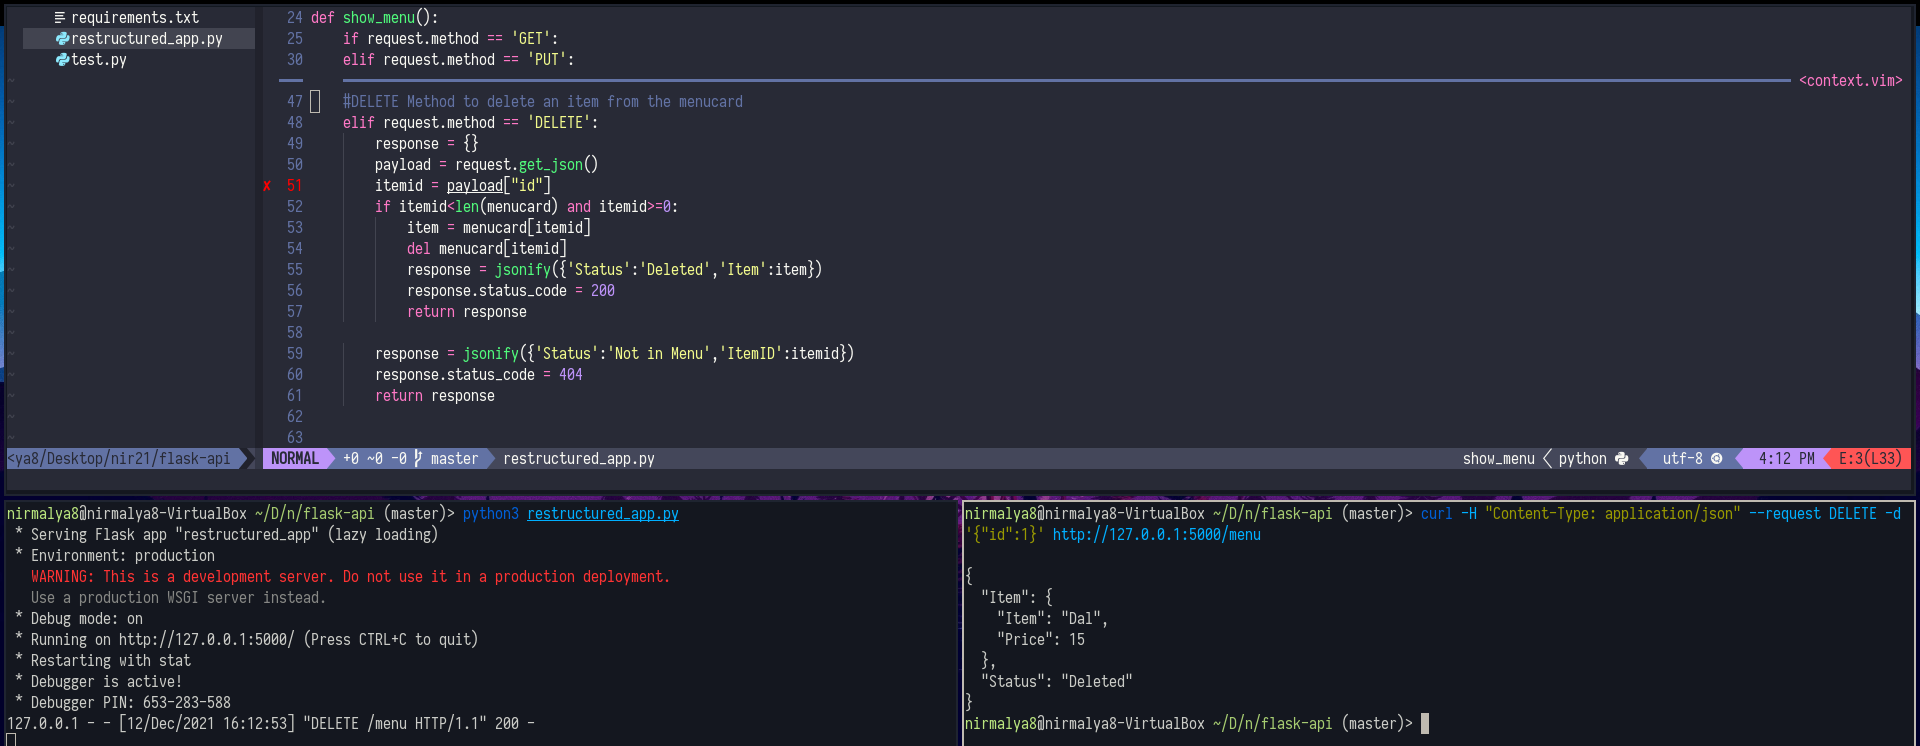
For a final check, we can make a GET request to the '/menu' route, which will help us confirm whether the items were added or deleted from the menu.
Use POST requests to create data
Now, it’s time to order a meal! It’s quite clear that this route will need an input to work with. We’ve decided to create a route, /orders, that will accept the following requests: GET and POST. The description for each of these requests is given below:
- GET: Check the items ordered as of yet
- POST: To order an item
The definition for the route and the method is this:
@app.route('/orders', methods = ['GET', 'POST'])
def order():
We’ve decided to check the requested method and put the code to complete the task inside the respective conditional blocks.
Let’s begin with what the GET request will handle. The GET request is supposed to show us the list of items we’ve ordered. If nothing is ordered, it should show a message and maybe throw 404 as the error code. The following code achieves this task:
#GET Request for obtaining the list of already ordered items
    if request.method == 'GET':
        response = ' '
        if len(orders)==0:
            response = jsonify({'Your orders':'Haven\'t ordered anything yet'} )
            response.status_code = 404
        else :
            response = jsonify({'Your orders':orders})
            response.status_code = 200
        return response
Now, let’s move into the POST request for this route. To reduce complexity, we’ll just keep the index of the item in the menu as the input, which will then be reflected in the orders list. Ordering, then, involves two basic steps:
- If the chosen item was already ordered, increase the quantity.
- If the chosen item was a new item, then it was just ordered.
The code for this would look like the following:
# POST Method to add an item to orders
    elif request.method == 'POST':
        response = {}
        payload = request.get_json()
        id1 = int(payload['id'])
        if id1= len(menucard):
            response = jsonify({'Status': 'Not in menu'})
            response.status_code = 404
        elif menucard[id1] in orders:
            for i in orders:
                if i['Item'] == menucard[id1]['Item']:
                    i['Quantity']+=1
            response = jsonify({'Status': 'Updated quantity','Item':menucard[id1]})
            response.status_code =200
        return response
The cURL command for ordering a certain item looks like this:
curl -H "Content-Type: application/json" --request POST -d '{"id":2}' https://127.0.0.1:5000/ordersNow, it’s time to order a few items and check the output.
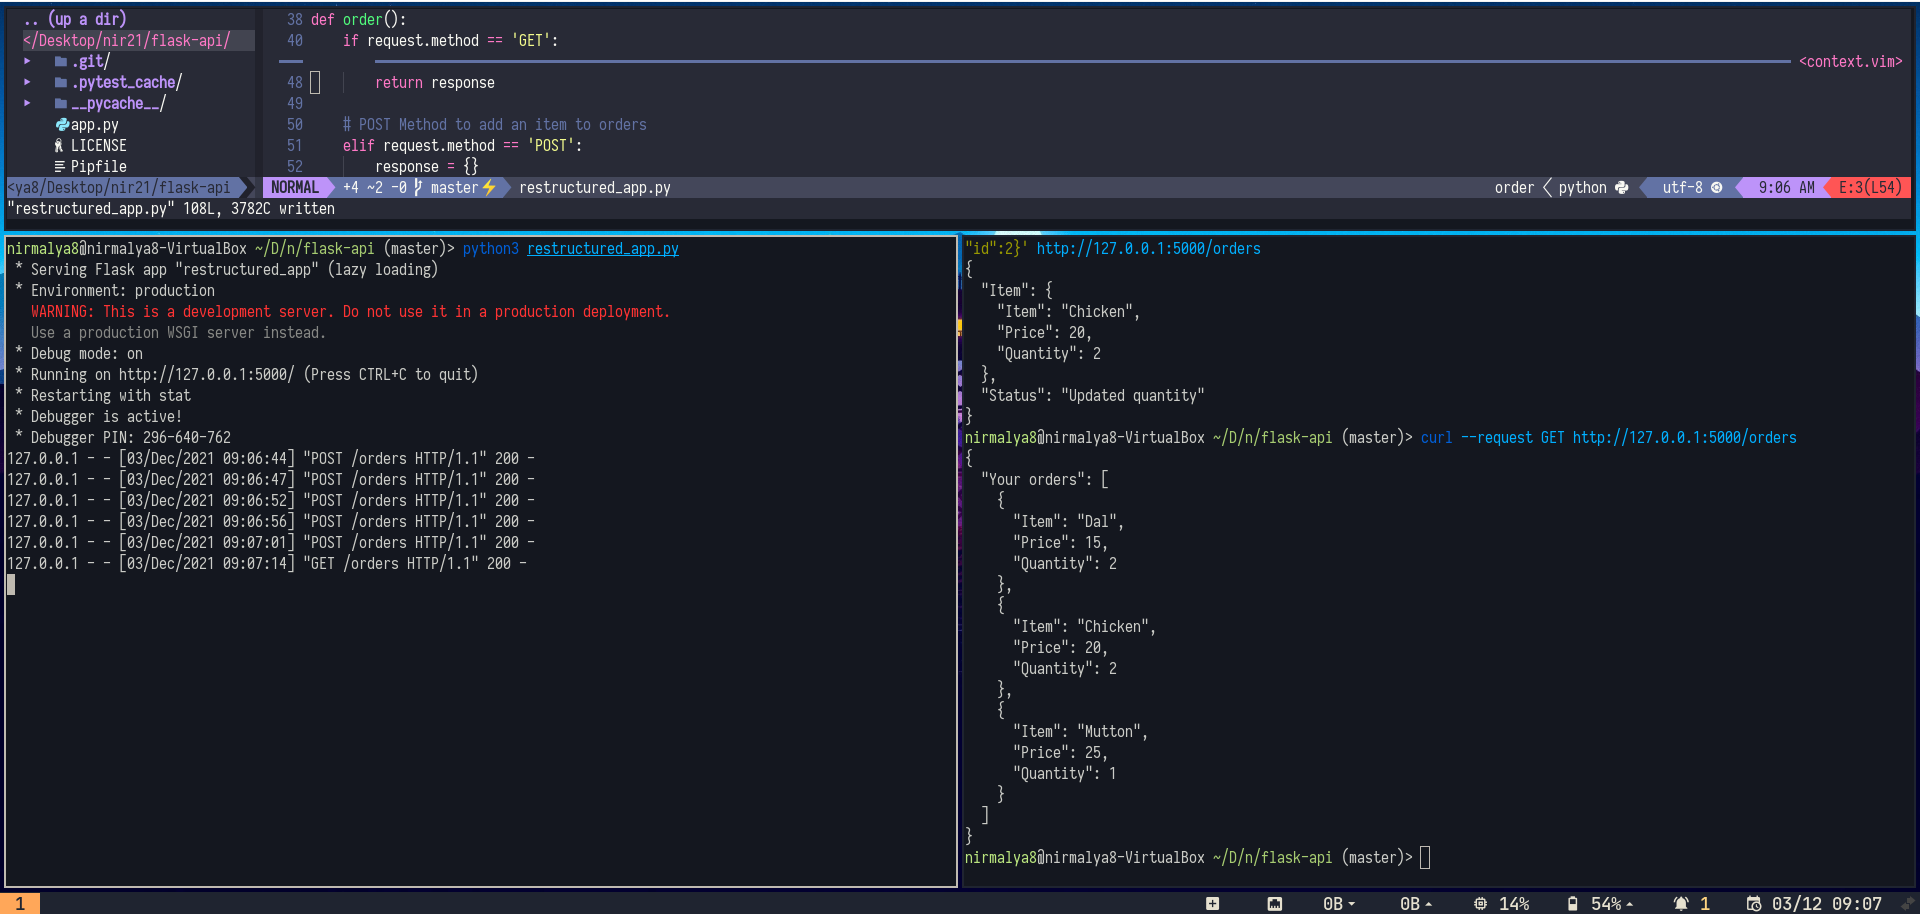
The code is working fine, and our API seems to be up and running!
Of course, you can write similar routes to find the total price of an order and delete items that were already ordered. I’d encourage you to try coding these routes up and coming up with the cURL commands for them on your own. As promised, all of the code shown in this article can be found in this GitHub repository. You can also download it directly if you prefer.
Final thoughts on building APIs in Python
At the end of the day, there are a lot of options for building APIs in Python, with FASTAPI being one of the frontrunners. Due to its simplicity, Flask can also be used. Creating APIs for smaller parts of a large software solution makes sense because it makes it easier to debug the code in the event any errors are found.
This blog post was created as part of the Mattermost Community Writing Program and is published under the CC BY-NC-SA 4.0 license. To learn more about the Mattermost Community Writing Program, check this out.


