
A guide to static analysis in JavaScript and TypeScript
The demands of a tight production schedule can make it difficult to produce consistent, readable, and concise code in the lead-up to a manual code review. This often makes the process stressful — if not outright dreaded.
Standard tests are a critical part of development that verify that our code produces the expected outputs. But great tests don’t always lead to good code. Thankfully, we have another powerful tool to apply to produce clean code we can confidently add to our codebase: static analysis.
In this article, we’ll explore one of the most common static analysis tools available to us as JavaScript and TypeScript developers. Let’s first examine what static analysis is and determine where it fits into our development pipeline.
What is static code analysis?
Static analysis, also known as static code analysis or static program analysis, is the automated inspection of software in its static state, performed without its execution. Static analysis tools identify code patterns that may introduce security vulnerabilities, performance issues, or problems with compliance.
Static analysis is usually implemented as part of the CI/CD pipeline alongside the rest of a company’s tests. The added benefit of a great static analysis tool, however, is that it addresses areas that traditional testing doesn’t cover, often catching incorrect logic within functions, calls to old or unsecured software, or syntax practices that are outdated (or simply wrong).
It applies the meticulous efficiency of a computer to detect code smells.
So, it resembles a code review that another developer on your team would usually perform — but without any of the accompanying stress!
What are code linters?
JavaScript is dynamically typed, meaning we don’t need to declare variable types because the interpreter assigns a type at runtime based on the variable’s value.
TypeScript is also dynamically typed by default but optionally provides static typing to let developers apply static analysis and IDE support. TypeScript’s static typing presents its own challenges, but in this article, we’ll focus on dynamically typed code, for which we can’t rely on the compiler or a dedicated tool to run our static analysis for us.
In a situation like this, we often use code linters to perform our static analysis. We’ll also briefly mention formatters here since the formatting improvements make it easier to spot mistakes. Prettier is a popular JavaScript/TypeScript formatter. It’s a great tool for keeping your code a little more human-readable, but it doesn’t perform the same functions as a linter.
A code linter checks for issues that are more complex than formatting errors but don’t necessarily break the code. It flags code it finds that has problems with readability, formatting consistency, possible logical errors, or deviation from best practices for a particular language.
It compares code against a set of conventions and standards. But these rules are often configurable so that we can tailor them to the needs of our codebase. For example, we can often configure a linter to apply selectively, toggling for a specific project, file, object, or even down to the line. Many frameworks also offer their own rule extensions for linters, such as ESLint’s Vue extension.
ESLint is a popular linter and a staple of static analysis for projects written in JavaScript or TypeScript. Let’s see how ESLint analyzes a simple TypeScript code fragment and what recommendations it makes for us.
What you’ll need to get started with static analysis
Before we start fixing our code, we first need to organize our test project and install ESLint. We’ll use npm, but you can use Yarn if you prefer.
Let’s initialize our project and environment first.
To create your project folder and navigate to it, run the following commands in your terminal of choice:
mkdir
cd
Then, initialize npm with the following command:
npm initFollow the instructions to set up a repository.
How to Run ESLint
For instructions, if you’re using Yarn, or if you’d like to examine these steps in more detail, you can look at the TypeScript-specific quickstart guide for ESLint.
To install ESLint, run the following command in your terminal:
npm install --save-dev eslint typescript @typescript-eslint/parser @typescript-eslint/eslint-pluginThen, create a .eslintrc.cjs file in your project’s root directory and add the following code to it (you can also add this to package.json directly):
module.exports = {
  root: true,
  parser: '@typescript-eslint/parser',
  plugins: [
    '@typescript-eslint',
  ],
  extends: [
    'eslint:recommended',
    'plugin:@typescript-eslint/recommended',
  ],
};
This gives you a very basic configuration for ESLint to understand TypeScript and apply some best practices.
Once your setup is complete and ESLint is ready, we can begin to statically analyze some sample code.
Statically analyzing TypeScript code
To demonstrate how ESLint works, we’ll use a very basic example.
Create a new file in your project directory and enter the following block of TypeScript code into it:
let test:string = "Henry";
let score1:number = 100;
let score2:number = 95.60
let sum = score1 + score2
console.log("Name: "+test)
console.log("First Score: "+score1)
console.log("Second Score: "+score2)
console.log("Total Score: "+sum)
Save your file; we’ll get back to it in just a moment.
When we run our code in a TypeScript playground, it runs with no errors and outputs the expected result. This block of code would likely pass detailed unit tests, and we could reasonably describe it as objectively readable.
Now, let’s run ESLint. We could add an npm script to our package.json file to avoid needing to repeat the command every time we run ESLint. But for our basic use case, we’ll just use the command.
Navigate to your project’s root directory, then enter the following command in your terminal:
npx eslint .This command lints every compatible file in your project folder — sometimes providing errors that are not relevant to our example, but that’s okay!
When we run ESLint on our code, it displays the following output:
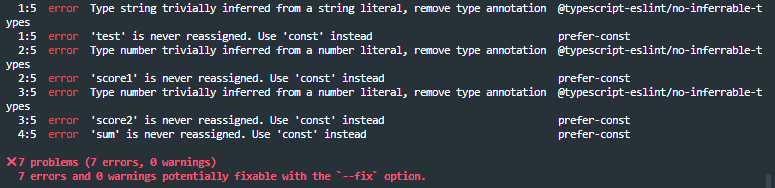
ESLint has caught multiple issues that an average compiler and parser wouldn’t catch! We are shown seven errors and no warnings:
1:5 error Type string trivially inferred from a string literal, remove type annotation @typescript-eslint/no-inferrable-types

1:5 error 'test' is never reassigned. Use 'const' instead
prefer-const

2:5 error Type number trivially inferred from a number literal, remove type annotation @typescript-eslint/no-inferrable-types

2:5 error 'scorel' is never reassigned. Use 'const' instead
prefer-const

3:5 error Type number trivially inferred from a number literal, remove type annotation @typescript-eslint/no-inferrable-types

3:5 error 'score2' is never reassigned. Use 'const' instead
prefer-const

4:5 error 'sum' is never reassigned. Use 'const' instead
prefer-const

7 problems (7 errors, warnings)
7 errors and warnings potentially fixable with the `--fix` option.
All seven are easily fixable on a simple code block like ours.
The first issue ESLint finds (@typescript-eslint/no-inferrable-types) is that the types for our variables are inferred from our declarations, so we don’t need to include the variable types after our variable names.
The second issue it points to (prefer-const) is that the variables are not reassigned within our program, so we can just declare them as constants by using const instead of as variables by using let.
We can either manually revise our code or use ESLint’s functionality to make changes directly in the file.
To apply the recommendations using ESLint, enter the following command in your terminal:
npx eslint --fix .It’s important to note that this works well for our example, but not every type of error is fixable using this option.
After fixing the ESLint errors, the revised contents of the file containing our code block now look like this:
const test = "Henry";
const score1 = 100;
const score2 = 95.60
const sum = score1 + score2
console.log("Name: "+test)
console.log("First Score: "+score1)
console.log("Second Score: "+score2)
console.log("Total Score: "+sum)
If ESLint doesn’t find any errors when we run it on our code, it exits with a 0 exit code. Running ESLint on our code again produces no errors or warnings, so we can see the result is safer and more stable code than we began with.
Learn more about static analysis in Javascript
As developers, we often do our best to create the best products possible and ensure other developers can easily work on our code. However, one pair of eyes is often insufficient to catch mistakes and ensure a stable codebase.
Static analysis tools let us examine our code before our software is executed. They offer the benefits of a code review but are more thorough and less error-prone than human reviewers.
Although formatters can style our JavaScript and TypeScript code and make it more readable, they don’t catch issues with logic or style that may create dangerous or unstable code.
A linter, such as ESLint, is a simple and powerful addition to any developer’s repertoire. As we demonstrated, they can often catch even the most subtle errors in our code or provide warnings when code is suspicious — invaluable when we use a language like TypeScript that lets us use dynamic or static typing. We recommend this comprehensive guide on How to Format Code on Save in VS Code with ESlint to learn tips and tricks for getting the most out of ESLint.
This blog post was created as part of the Mattermost Community Writing Program and is published under the CC BY-NC-SA 4.0 license. To learn more about the Mattermost Community Writing Program, check this out.


