
Integration testing with GitLab CI and Docker
GitLab is a complete DevOps platform that enables enterprises and organizations to deliver software to markets smoothly while ensuring high product quality. Software engineering practices use many testing techniques, from unit tests to integration tests.
This article helps you understand software testing with unit and integration tests. It highlights the fundamental differences between unit and integration tests and demonstrates how to write integration tests for your applications.
For demonstration purposes, we’ll use Node.js to write an application that consumes an external API service to respond.
Unit testing versus integration testing
The two most notable testing types are unit testing and integration testing. In short, we can call the unit test “the test for small things” and the integration test “the test for big things.”
First, let’s look at unit tests. Unit tests validate a software’s essential components or modules in software development. A unit is an independent component in a program. For example, think of a function or a method in a JavaScript application. A unit test tests the behavior of a single function that doesn’t depend on other functions.
Unit tests are usually small in size. Each test runs independently, so it can ensure that other tests running on the system don’t impact its behavior and output. And each unit test can run without impacting other tests. Another thing to note is that unit tests don’t depend on external components like a database or cache storage.
Unit tests are usually part of a test suite because they run fast, you can run them in parallel, and they don’t require expensive resources such as databases.
Let’s take the following function as a test case:
function add(a, b) {
 	return a + b;
}
Usually, the testing practice used to ensure the sequence of steps is:
- Arrange: prepare the variables and any other resources needed.
- Act: take action to modify the state.
- Assert: validate that the action modified the state and the state is valid and as expected.
In a test case, we write:
it (“2 + 2 = 4”, () => {
	// arrange
	let a = 2;
	let b = 2;

	// act
	let response = add(a, b);

	// assert
	response.should.be.equal(4);
});
Once we run this test, the method prepares two variables, calls the function we must test, and then validates the response if it was what we expected. In a unit test, we sometimes provide a hardcoded response to validate the output of a method. We can create a fleet of these tests, each validating the behavior of a single component. Therefore, if all the components behave correctly, we can be sure that the application works normally.
However, that’s often not the case.
For example, if a function in an application depends on an external service, such as a database or an API service, the output might not be normal. Our unit tests only test each component based on our mock data. But we haven’t tested the entire application. We might have to orchestrate the user flow to determine if the application behaves correctly as a whole.
Orchestration is the point where we begin integration tests. Integration tests validate if all the application components integrate well. At this testing stage, we validate the external services and how they impact our application’s behavior. For example, what happens when the database or API service fails?
Set up your environment
Before starting the tutorial, we must set up the environment and download some runtimes if we don’t have them. To continue, we need:
- Node.js runtime (version 17.5 or higher, for fetch support) and npm
- GitLab account
We can download the Node.js runtime directly from the Node.js website. The packages we use in this article have links, so you can follow along and download the packages you want to explore and try out in your integration tests.
Finally, we need a GitLab account to run the integration tests in a continuous integration pipeline. This way, GitLab tests and verifies our changes each time we make a change before accepting and merging them.
The code for this article is available as an archive that you can download and explore on your own. You can also clone it locally with the following command:git clone https://github.com/afzaal-ahmad-zeeshan/nodejs-integration-tests
Integration testing using REST
As mentioned earlier in the article, integration testing is about testing the components that communicate with the external services and resources, such as databases and RESTful APIs. In this tutorial, we explore how to test the integration of our web applications with external REST APIs.
Read on to learn how to:
- Prepare the endpoints in an application that consumes middleware and provides access to the REST APIs.
- Use Jest to run the test files in our application.
- Use Mocha and Chai to run the assertions on our application test suites.
- Create stubs using Sinon.JS (more on stubs later).
This integration suite sends a request to an endpoint and then validates the response.
TMDb API
For the sake of this article, we use the freely available TMDb API (a movie database). TMDb is a community-driven platform that provides customers with open and transparent access. The TMDb API enables developers to fetch the details of movies and TV series on-demand.
We use the endpoints provided by the TMDB API to consume the API, fetch all the popular movies, and then provide them as a response. To learn more about the TMDb API, consult their documentation.
Developing a web app
Let’s start with the web application. We build a basic Express.js web application that exposes an API endpoint. In the endpoint, we return the movies we receive from the backend API we use. If you didn’t clone the repository above, the following steps will create it for you locally. Otherwise, you can follow along with the provided code.
Create a new Node.js application by typing the following in a console window:
$ npm initThis command creates a package.json file for us. The package.json file is the entry point for our Node.js application. Next, add the required dependencies:
$ npm install express@^4.18.1 jest@^28.1.2 [email protected] [email protected] [email protected] [email protected] [email protected]Once that’s done, we create an entry point file that acts as the bootstrap for our Express.js application. To keep the main application source code separated from the test, we put the application source code in a src folder.
Create a src folder in the folder in which you just created the package.json file.
Inside the src folder, create an app.js file with this content.
let express = require("express");
let app = express();
require("dotenv").config();

// add controllers
app.use("/movies", require("./controllers/movies"));
app.all("*", (req, res) => {
	res.send("404");
});

module.exports = app;
We use the Express.js framework in the code above to create the web application.
Then, we set up the movie path routing and use an Express Router. We create this router next.
Last, we set a catch-all route to capture all the requests and return a 404 message. Note the module.exports = app part, which we use to export this configuration to another file. This part is important. If we start the web application server right here, our test suite won’t finish. You will understand this when writing the integration tests.
Now, create a folder named controllers inside the src folder.
Next, we must create the router for our endpoint. We can do this in a new file in the controllers directory.
In the file, put the following code:
let router = require("express").Router();
let tmdb = require("../../utils/tmdb");

router.get("/", async (req, res) => {
	res.send(await tmdb.getPopularMovies());
});

module.exports = router;
In this file, we create the router instance that accepts a GET request and provides the endpoint’s response from our backend API. We are using the middleware (utils/tmdb) we created ourselves. It has a single method (we can create more methods to provide more information about movies and TV shows and explore the documentation for common examples) that returns the popular movies. We are using the Fetch API because it doesn’t require any dependencies, and this API supports Promises. The Promise API in JavaScript enables asynchronous programming and helps prevent callback hell in JavaScript.
The utils/tmdb file contains the following code:
// Set the variables
const TMDB_API = process.env.TMDB_API;

// Create the middleware
let tmdb = {
	getPopularMovies: async () => {
    	let response = await fetch(`https://api.themoviedb.org/3/movie/popular?api_key=${TMDB_API}&language=en-US&page=1`);
    	let _json = await response.json();
    	return _json;
	}
};

module.exports = tmdb;
In this code, we use the TMDB_API environment variable. This API key is necessary to access the API.
After creating an account, use the TMDB documentation to learn how to get an API key for your account. Then use the dotenv package to set up development environment variables for the API wrapper above.
The .env file in the root of your project directory contains the API key from TMDB:
TMDB_API=<YOUR_API_KEY>In sum, this is the application that we will use. But before we move to the tests, let’s verify if the application runs and provides a response.
Create a new file, server.js, and put the following code in it to run the app.js code:
let app = require("./app");

let port = process.env.NODE_PORT || 1234;
app.listen(port, () => {
	console.log(`Server is listening on https://localhost:${port}...`);
});
Now, use the node --experimental-fetch src/server.js or npm start (the same command, which you can find in the package.json file of the given source code) to launch the application.
Once it starts, we can access the popular movies on the /movies endpoint (https://localhost:1234/movies). Here’s a preview of the raw JSON we get as a response from the TMDb API. The important thing to note is that the output has the following structure:
{
	"page": 1,
	"results": [
     	// movies here
	],
	…
}
We use this structure to test if our application has captured and returned the underlying API’s data.
Writing integration tests
Now that our web application is ready, we can write the tests to validate that our code is working as expected. This section uses JavaScript dependencies we can download from the node package manager (npm) registry.
Notably, we installed at the beginning:
- Mocha
- Jest
- Chai
- Chai-http
- Sinon
Now, create a test folder to store your test cases. It would be best if you gave useful names to the test files, each for a unique test case. Jest, the test runner we are using, uses the test file names "*.test.js". Meaning anything that ends with .test.js is a test file.
To test the functionality of this page, create a file called movies.test.js. Then, put in the following code:
// Configure the testing libraries
let chai = require('chai');
let sinon = require("sinon");
let chaiHttp = require('chai-http');
chai.use(chaiHttp);
let should = chai.should();
let expect = chai.expect;

// Ready the app for requests
let app = require('../../src/app');
let tmdb = require("../../utils/tmdb");

describe('GET /movies', () => {
	it('should not be empty, and returns response from the backend API', done => {
    	chai
        	.request(app)
        	.get('/movies')
        	.end((err, res) => {
                res.status.should.be.equal(200);
                res.body["page"].should.be.equal(1);
                done();
        	});
	});
});
Now, run the test by executing the following command:
$ npm testThe test script in the package.json file runs the Jest runner. If you don’t want to use npm for this, you can just execute jest as a command in the terminal. When you run jest, the Jest dependency executes the test suites. You can install the Jest dependency as a global tool using npm. To set up Jest to be available in your terminal, run:
$ npm install -g jestWhen the test runs, it creates an instance of the application.
Note how we use chai-http to start our web app in a process. Next, we use the same library to send a request to an endpoint handled by the app process.
For advanced use cases for chai-http, consult the documentation.
There are some cons to this approach:
- The application still makes a request to the backend service — which can be expensive, especially if we are paying for each request.
- The data is inconsistent and prone to change on every request — this means we can’t assert anything.
Therefore, we can use mocking in integration tests to use predefined data that doesn’t change each time we run a test. It’s also more cost-effective since we generate this data ourselves.
In JavaScript, we can use the Sinon library. To mock functions, we must use a concept called spying. Using the concept of spying, we can track when the code calls a method and changes the behavior. In our application, we are using the tmdb.getPopularMovies method to get the movies. While spying, we can track when the code calls this method, replace its original implementation with our own, and return a custom response.
At the beginning of the test, at the top of the it block, add this code:
// stub the tmdb
sinon.stub(tmdb, "getPopularMovies").returns({
	page: 1,
	results: [
           // movies here...
      ],
});
This method now tracks when the code calls the getPopularMovies method on the tmdb object. If it executes, it returns custom data. Now, we can always be sure that our application received this data in the controller and assert what our API returns.
Using GitLab Cl
Next, we must write the GitLab command line (CI) script that runs the pipeline on GitLab. For this, we need a free GitLab Cloud account.
On GitLab, we write a script in YAML in a file named .gitlab-ci.yml. The GitLab platform uses this file to run the CI pipelines for our project on each change. At the start of the file, we provide the Docker image we must use to run the pipeline. This image is important and valuable because it contains everything our application needs to build and test a Node.js application.
In the script, we define the steps necessary to build and deploy our project and specify what to do in each step. In effect, this creates a closed sandbox to test our code every time the pipeline runs.
Here’s the script we use:
image: node:latest

stages:
  - build

setup:
  stage: build
  script:
	- npm install
	- npm test
We only have one stage, and during this stage, we set up the dependencies and test our application. Note that we are using the latest version of the Node.js image from Docker. The newest version helps us ensure that the CI/CD pipeline is using the same version of Node.js as we are using locally on our development machine.
We could also change the version of the Node.js image, as long as it’s one of the supported versions from Docker. Since we are only testing the application, we don’t need to write the npm start command or package the script as a Docker image. However, the Docker concepts are essential because the GitLab pipeline uses a Docker image to run. Using Docker as a platform, GitLab CI can run in parallel and in isolation from other test suites.
To learn about advanced use cases of the GitLab CI file, consult their documentation for CI/CD or read the reference documentation for the .gitlab-ci.yml file.
When we push the changes to GitLab, our pipeline runs and tests our code for bugs. Here’s the output of the GitLab pipeline:
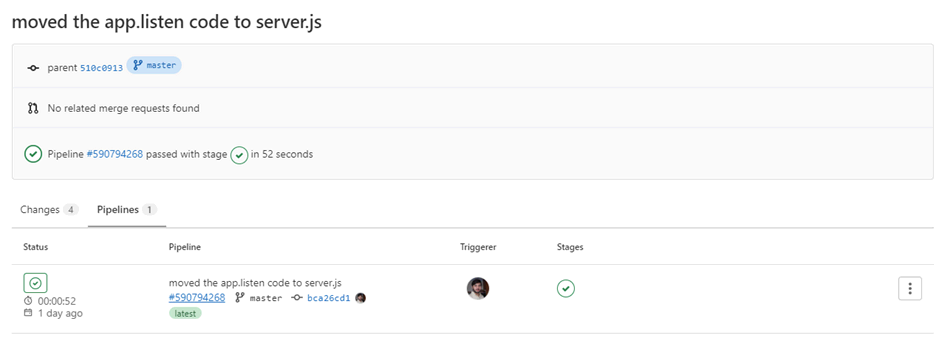
The result shows that the code we sent to GitLab didn’t cause the application’s build pipeline to fail. If any problems with the updated code existed, our build would fail due to the tests. If we open the pipeline, we can see that the tests we wrote ran, showing two tests passed.

Why use GitLab Auto DevOps for testing
Today, we learned about testing in Node, why we test software, and the differences between unit and integration tests. Integration testing is a way to ensure the quality of an application and software solutions. We explored integration testing using Jest as a test runner with Mocha and Chai to write the test suites for the program flows. The integration tests run the application as an end user would to test the integration between different components. Often, these components are external services such as databases or API endpoints.
To prevent extra costs, we mocked actual services by using custom data. Sinon is a JavaScript library that enables us to mimic external resources to inject our custom data. The custom data helps us ensure that our application code provides the correct output for the provided input and prevents rate limiting.
The GitLab CI/CD use Docker images to run the build pipelines in isolation. Each pipeline runs with a base Docker image. We used Node.js’ latest image for our local environment to ensure the same conditions and environment we would have in production.
To learn more about why GitLab is an excellent platform for developers, check this out.
This blog post was created as part of the Mattermost Community Writing Program and is published under the CC BY-NC-SA 4.0 license. To learn more about the Mattermost Community Writing Program, check this out.


