
Building applications using Go: Tips and tricks to tie it all together
This is the final installment in a six-part series on building applications using Golang. Jump to the end of this article to check out previous installments.
Building a microservice-based cloud-native application can be challenging at first. But with the right direction and resources, you can start to containerize monolithic applications or build a new microservices-powered app from scratch.
It’s important to note that building a microservice pattern-based application and deploying it to the cloud has its own set of challenges. So, before setting out to create an application, it’s important to understand the benefits and disadvantages of microservice and monolithic architectural patterns. It’s more important to understand why there’s been a shift to cloud-native applications, how these practices help modernize and scale your requests, and why the previous patterns were not scaling as per dynamic need.
This guide covers useful tips for building microservice-based applications and also presents a demo e-commerce backend created in the form of tutorials. It also gives you insight into the architecture of the application and some add-ons if you want to extend the app further.
At a high level, here are the main topics covered in this guide:
- What is the difference between monolithic and microservices?
- How to deploy on cloud
- Observability recommendations
- Development workflow
- What’s next?
What’s the difference between monolithic and microservices?
Suppose you want to create a JavaScript-based product or service. Now, to start understanding the product, you need to understand the functionality it will provide, and you also need to come up with a set of requirements that need to be implemented. This may include a server, the process that crawls through the internet to get content, and a service that performs analytics on the type of traffic coming to your product.
All of these can be easily implemented in JavaScript using Node.js and TensorFlow.js when your product is under development and the traffic isn’t high. However, when your product matures, you would need to ensure low latency. So, utilizing the power of only one programming service is not enough.
However, if you’ve built your application and deployed it, you’ll face a dilemma. As the functionality of a code increases, it becomes more and more rigid. While serving users, it would be difficult for you to change the existing code or even the application’s architecture to meet ends with the traffic without incurring downtime.
You’ll face similar problems when adding new functionality to the product. Although building will be quite easy, this is how a monolithic application restricts the scale of your product. New engineering resources joining your team will feel overwhelmed seeing such a large codebase; it will take more time for them to learn how to develop and understand the codebase. Additionally, there will be a longer boot time for your application wherever you deploy it, so new releases will get delayed. If a new technology stack comes out which can solve a problem you’re facing in a more efficient way saving you money, it would be quite difficult for you to adopt it.
Now, let’s break the above product into several single-standing smaller applications that will be linked using communication calls (i.e., microservices). You’ll have to independently develop three applications including: a central server that will connect your applications, an application that does analytics, and an application that does web crawling and returns the results. This sounds like more effort and more services are required to link them.
However, there are numerous benefits to such an approach.
The first is that you can use your desired tech stack for the application. For example, you can build the server in Golang to utilize the power of consistency, and you can build a web crawler and analytics application in Python to leverage the ease of code and available libraries.
At the same time, you can divide your engineering teams accordingly to work on smaller applications. Since the code base is contained, the development process will be smoother. Developers can understand, code, and deliver faster.
What’s more, individual release velocity will increase and there will be room for out-of-the-box innovation. With dedicated teams, if some application goes down, this won’t mean that the entire product goes down, since other functionalities won’t be affected.
How to deploy on cloud?
When you are making a distributed service, it’s important to take care of and document your deployments to make them accessible to the public. The documentation is important for the engineering resources who might come in when the engineer who deployed the application leaves your team.
Take note of the applications you have and choose the type of cloud you want to deploy your application on (e.g., public, private, or hybrid). It’s also important to take note of the technologies you’re using and how compatible those are with infrastructure. After identifying the type of cloud and the cloud provider (e.g., on-prem, GCP, AWS, Azure, etc.) you want to deploy on, the next step is to identify your type of solution you want to use to make your product available. You can choose between serverless options, managed Virtual Machines, or container orchestration like Kubernetes based on the type of product.
Most cloud providers make it easy for the deployment steps and are highly integratable. You can compare the cloud providers to understand the service-level agreements (SLAs) provided for their internal tools. This is to ensure that if your application goes down because of the cloud provider’s infrastructure or outage and an SLA is violated, you’ll be compensated accordingly.
It’s not enough to have your application deployed on the cloud. You have to utilize the cloud’s abilities to ensure high availability and reliability. Configuring administration roles to define who can modify cloud resources, having applications set up across multiple regions to ensure global availability, and implementing firewall rules for the desired incoming traffic are a few starting steps you need to take. Having deployments in multiple regions can also help to divert traffic in the event your application in a certain region goes down.
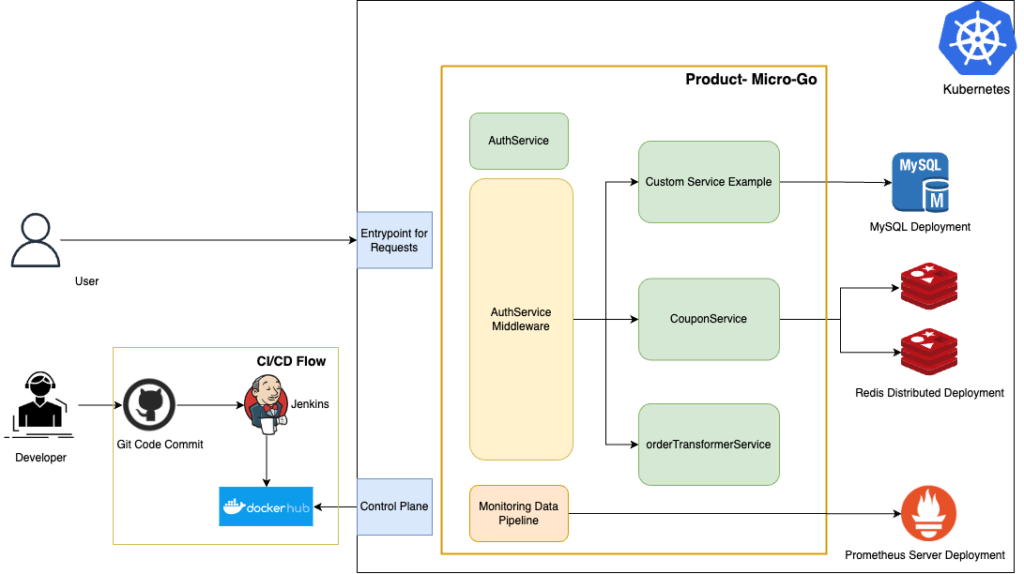
An advantage of using a microservice architecture pattern is you can use different backends or data services based on ease of use or efficiency. This can be seen in the architecture diagram where a customer service uses a MySQL deployment as a backend. The implemented tutorial uses a variety of tech stacks including distributed Redis instances and a monitoring pipeline that uses Prometheus as an add-on. These tools were selected because of the scope of the service being developed. Besides these services, it’s easy to develop native services — and develop them progressively.
In this tutorial series, Kubernetes has been used as a container orchestration service to deploy the Docker image of the product and deploy the services in place to interact with these. Kubernetes can also be used with a package manager known as Helm which can help you set up persistent storage for your applications. The application on Kubernetes doesn’t necessarily need to be stateless as long as we manage the state properly. Various cloud providers provide Kubernetes engines based on the abstraction of their underlying infrastructure.
Observability recommendations
When your product is up and running on the cloud, it’s difficult to observe the behavior of the product from an external point. Cloud acts as a black box and you need to have pillars of observability. i.e., metrics, logging, and tracing in place and at a central store to derive insights. This data can also be saved in a data lake to apply analytics and machine learning models to understand how the product is dealing with peak traffic or even how the product is using the underlying infrastructure and whether additional enhancements are required.
Setting up observability is itself a challenge in a distributed sphere as you will have to maintain additional services or tools and that you’ll have to pay for. For logging, pipelines can be built from scratch and can be ingested to a good time-based backend like Splunk. The use of logs will help you identify bugs and give developers an insight into the events in the application. There are log levels in place — including trace, debug, info, error, and fatal — which are verbose on a different level. Setting the appropriate log level can make sure you don’t face additional costs for storing and querying unnecessary logs. This is important because the data flowing through your pipeline, being stored and analyzed, will generate costs, and storing logs that are not needed is a burden.
In this guide, we’ve developed a simple monitoring pipeline using Golang concurrency principles to scrape metrics from the endpoint that the application exposes using Prometheus. In case you’re unfamiliar, Prometheus is a cloud-native tool that can collect custom metrics across applications, group them, and expose them. These outputs can be read from different tools like Grafana or other backends which you can use to make live dashboards. The concurrency workers used in this case ensure that the monitoring pipeline is functioning efficiently and using the infrastructure in the best way. In some cases, concurrency can increase performance by up to 8x.
Cloud providers also have backends to store metrics and log data in a central place. They also provide good analytical and real-time dashboards which you can utilize in one place. These are highly reliable and can store huge amounts of data. They also provide the functionality to add custom alerts and pager services that can notify your engineering teams when something goes wrong. You can evaluate if you want a pipeline from scratch or prefer using these services based on your use and the costs involved.
Development workflow
Having testing in place for your product code is an essential part of the development cycle. Testing can be done on many levels, including unit testing to test the function scope, integration testing to test the module scope, functional testing to understand the feature scope, and end-to-end tests. The scenarios for all of these are very different and often help to catch the edge cases if the application is missing anything. At a high level, testing reduces the scope of errors in production applications, helps catch bugs early in the development cycle, and enables developers to focus on the application’s functionality.
Testing is integrated using a continuous integration and a continuous delivery pipeline. This ensures that code containing bugs doesn’t go unnoticed when making changes to your source code. Developers often create the CI pipelines in such a way that when a type of test is failing, the code is not allowed to merge. This can be easily integrated with GitHub, GitLab, or Bitbucket to assist with the flow.
After merging the code post-review, we want the changes to be reflected in our application in production. For this, we set up a continuous delivery (CD) pipeline which ensures that the changes are delivered to the production app. It’s a common practice to set up environments to test the application like qal, pre-prod, and prod. The application is tested in each environment and may even be subject to load testing to understand the behavior. The CD pipeline delivers the image with the new changes to an image repository from where it can be picked by the required environment.
In this tutorial, we’ve shown how to set up a CI/CD pipeline using Jenkins. You can easily set up steps for your unit and functional tests, build the Docker image from the source repository and push it to the Docker Hub. Having good CI/CD in place eases the developers from manual releases and deployments. In this tutorial, Kubernetes detects the image automatically and updates it while keeping the application live.
What’s next on your journey of building applications in Go?
The main aim of this tutorial series was to give users insight into developing a cloud-native application and using the best practices to do so. You can try building your microservice-based product using the learnings from this guide.
The Product Micro Go is an open source repository. Feel free to contribute, file bugs, and extend the repository as per your needs.
Thank you for reading this far and good luck with your cloud-native journey!
Did you get a chance to read every installment in this series? If not, here are some pieces you may want to check out:
- How to Build an Authentication Microservice in Golang from Scratch
- How to Use Redis at Scale with Golang and Kubernetes
- Everything You Need to Know about Golang App Testing
- How to Set up a Jenkins CI/CD Pipeline for Your Golang App
- Concurrency in Golang: Building a Data Pipeline for Monitoring Microservices from Scratch
This blog post was created as part of the Mattermost Community Writing Program and is published under the CC BY-NC-SA 4.0 license. To learn more about the Mattermost Community Writing Program, check this out.


