How to create a full CI/CD pipeline with Jenkins
One of the game changers in modern software development is Continuous Integration and Continuous Development (CI/CD). Both large, established organizations and small, growing companies use CI/CD to deliver software faster and to detect bugs in the software lifecycle.
In this tutorial, I’ll create a full pipeline to practice CI/CD using Jenkins, including how to set up Jenkins on Docker. I’ll give an in-depth view of a Jenkins pipeline example using Jenkinsfile. You will also learn about stages, steps, post actions, environment variables, credentials, email notifications, and deployment.
Prerequisites
This tutorial’s code lives in this repository. To add your email information on the main branch (for use later on), fork the repository and run it based on your desired use cases.
I assume you have a basic knowledge of what CI/CD is and what Jenkins is. If you don’t already have Jenkins installed on your machine, I will explain how to run Jenkins on Docker in the next section. This way, you’ll be able to follow along with this tutorial without worrying about your setup.
Install Jenkins on Docker
If you don’t have Jenkins on your machine and want to install it and play around with it, check Jenkins documentation to install it on your desired OS.
If you want to include Jenkins on a Docker container, or you want to avoid the hassle of running it on your machine, enjoy the ride here to install Jenkins using a lightweight docker image.
I’ll use an Alpine version of the Jenkins docker image, which you’ll find on jenkins/jenkins docker image with the tag lts-alpine-jdk17.
Now, open your terminal and start writing some commands.
To pull the docker image, run the following:
docker pull jenkins/jenkins:lts-alpine-jdk17Run it with the following command:
docker run -p 8080:8080 -p 50000:50000 --restart=on-failure jenkins/jenkins:lts-alpine-jdk17After you run the image, you’ll find a password generated by Jenkins. Copy this password because you’ll need it when you log into the Jenkins UI.
Open up the localhost:8080 on your browser and paste the password in the required field:

After you click continue, choose whether you want to install plugins or leave Jenkins as the bare minimum setup. In my case, I installed recommended plugins.
The next screen sets up the admin login; fill in your desired information:

Next is the instance configuration of your Jenkins URL. Leave it as the localhost or if you want to customize it with your own domain, change it to it.
Click on start using Jenkins. You’ll then get redirected to the Jenkins interface:

Jenkins pipeline example
What is a pipeline? A pipeline is a sequence of stages in your software. Each stage has a set of steps to do specific tasks. Let’s break this down in the following sections, where we’ll go through an example of how to use Jenkins to run a full pipeline.
Create a new Jenkins build job
A build job in Jenkins is what you need to execute tasks in your workflow. It’s the job that you need to build a pipeline. A typical job would start with building your app, then unit testing, and finally deploying to production. The exact stages of your pipeline depend on your application needs.
Create a pipeline job
Now you’re at the Jenkins dashboard page. Click on the New Item button. It will open a new window. Select “pipeline” for your project style and name your Jenkins job:

I named my project “simple-jenkins”.
Usually, Jenkins checks out the source code of your application and then builds it on its workspace. So the next thing to do is to let Jenkins know where your code lives. You do that by setting up an SVC (source version control e.g., Github) in your pipeline.
Scroll down to the Pipeline section and choose “Pipeline script from SCM” under the Definition. Use Git in the SCM, which expands the repository details. Type your repo in the repository field like the following image:

This pipeline should fetch the source code in this repo. As mentioned above, fork the repository and run it based on your desired parameters later in this article.
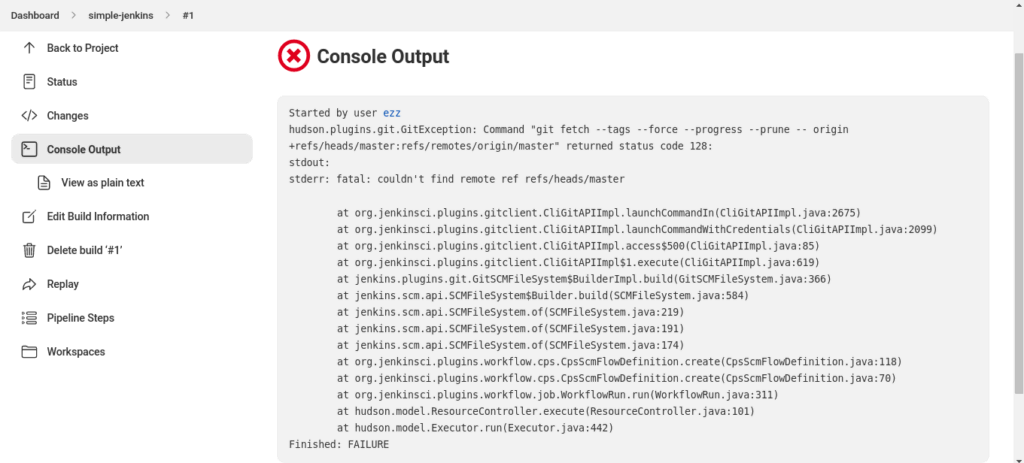
If you hit save, the Jenkins job starts to run but with an error of stderr: fatal: couldn't find remote ref refs/heads/master. This means that Jenkins couldn’t fetch this master branch from the remote.

That’s because our repo does not have a master branch. It rather has main and start_here branches. Configure that default setting in the Configure page of this job and select our repo’s branch.
Click on the Configure button of this simple_jenkins job. Scroll down to the Pipeline section and rename the branch from */master to */start_here under Branch Specifier.
Now, run the Jenkins job. It succeeds with the following stages on the UI:

Pipeline on Jenkinsfile
Jenkinsfile is a file where you define the pipeline of your workflow, written in Groovy.
The stages you see on the UI are defined in the start_here branch’s Jenkinsfile as follows:
pipeline {
    agent any
    stages {
        stage("Build") {
            steps {
                echo "Building the app..."
            }
        }
        stage("Test") {
            steps {
                echo "Testing the app..."
            }
        }
        stage("Deploy") {
            steps {
                echo "Deploying the app..."
            }
        }
    }
}
A pipeline block is a user-friendly name to define a CD pipeline. In this simple Jenkinsfile, it contains an agent and stages.
Per Jenkins documentation, an agent instructs Jenkins to allocate an executor (on a node) and workspace for the entire Pipeline.
As we discussed earlier, each stage has a set of steps. In this case, you have three stages: Build, Test, and Deploy.
You can define steps in each stage in which you can run bash commands like the echo command. You can also run commands in multiple steps.
Add multiple steps
If you want to run a shell script in a multi-line string, add an sh step enclosed by '''. You can add a shell command to each line in that string like the following Build phase:
...
stage("Build") {
    steps {
        echo "Building the app..."
        sh '''
            echo "This block contains multi-line steps"
            ls -lh
        '''
    }
}
...
Clean-up steps
After the pipeline has completed, you may need to add additional steps after the stages are finished. These steps are executed inside a post section which typically comes after the stages section, at the end of the pipeline.
Let’s see that in action in the Jenkinsfile:
pipeline {
    agent any
    stages {
        ....
    }
    post {
        always {
            echo "This will always run regardless of the completion status"
        }
        success {
            echo "This will run if the build succeeded"
        }
        failure {
            echo "This will run if the job failed"
        }
        unstable {
            echo "This will run if the completion status was 'unstable', usually by test failures"
        }
        changed {
            echo "This will run if the state of the pipeline has changed"
            echo "For example, if the previous run failed but is now successful"
        }
        fixed {
            echo "This will run if the previous run failed or unstable and now is successful"
        }
    }
}
I’ve trimmed the stages section here to focus on the post section. Here, you can see use cases for always, success, failure, unstable, changed, and fixed actions. There are also more post actions here that you may consider.
As you can see, here is how the post actions look in the pipeline:

After each job run, cleaning up the Jenkins workspace is important because disk space could be filled up. You want to clean up the workspace whether there is a success, unstable, or failure status. To do that, wrap it inside an always condition under the post section. A dedicated post condition called cleanup also runs regardless of the job status. See the following snippet:
// ..
post {
    // ..
    cleanup {
        echo "Cleaning the workspace"
        cleanWs()
    }
    // ..
}
// ..
Click on the logs of the post actions area in the Jenkins UI. Then inspect the “Delete workspace when build is done“ by clicking on the dropdown. You’ll find something like the following:
[WS-CLEANUP] Deleting project workspace...
[WS-CLEANUP] Deferred wipeout is used...
[WS-CLEANUP] done
Now, the workspace is cleaned up after the build is finished.
Environment variables
You can set environment variables globally using the environment block. As you might expect, you can also define environment variables inside a stage. If so, this will make the variable accessible only to the scope of its defined stage.
You can use environment variables defined in the Jenkins pipeline already, such as BUILD_NUMBER and JENKINS_URL. To learn more about these vars, consult the Jenkins doc.
Notice the Jenkinsfile now after adding the environment variables:
pipeline {
    agent any
    environment {
        DB_URL = 'mysql+pymysql://usr:pwd@host:/db'
        DISABLE_AUTH = true
    }
    stages {
        stage("Build") {
            steps {
                echo "Building the app..."
                sh '''
                    echo "This block contains multi-line steps"
                    ls -lh
                '''
                sh '''
                    echo "Database url is: ${DB_URL}"
                    echo "DISABLE_AUTH is ${DISABLE_AUTH}"
                    env
                '''
                echo "Running a job with build #: ${env.BUILD_NUMBER} on ${env.JENKINS_URL}"
            }
        }
        stage("Test") {
            steps {
                echo "Testing the app..."
            }
        }
        stage("Deploy") {
            steps {
                echo "Deploying the app..."
            }
        }
    }
    post {
        always {
            echo "This will always run regardless of the completion status"
        }
        success {
            echo "This will run if the build succeeded"
        }
        failure {
            echo "This will run if the job failed"
        }
        unstable {
            echo "This will run if the completion status was 'unstable', usually by test failures"
        }
        changed {
            echo "This will run if the state of the pipeline has changed"
            echo "For example, if the previous run failed but is now successful"
        }
        fixed {
            echo "This will run if the previous run failed or unstable and now is successful"
        }
    }
}
Credentials
To avoid exposing sensitive data, such as passwords and tokens, you need to configure credentials in the Jenkins pipeline. Let’s see how to configure them.
Navigate to the dashboard tab and select Manage Jenkins. Click on Manage Credentials under the Security section and select Jenkins and Global credentials (unrestricted). There you can add credentials at the left panel. Choose Secret text from the Kind dropdown and type your secret text under the Secret text box. Then enter the ID, the unique name that you want to refer to in the Jenkinsfile. Here is a visual:

Similar to aws-access-key-id, you can set up the aws-access-secret-key credential.
Back to the Jenkinsfile, you can call these credentials using the credentials() helper method like the following:
// ..
environment {
    // ..
    AWS_ACCESS_KEY_ID = credentials('aws-access-key-id')
    AWS_SECRET_ACCESS_KEY = credentials('aws-access-secret-key')
}
// ..
In a later step, you can reference these credential variables using the dollar sign (e.g. $AWS_ACCESS_KEY_ID and $AWS_SECRET_ACCESS_KEY).
Now push the new Jenkinsfile and run the Jenkins job. You should find a success status. Make sure to refer to the correct credential IDs as configured.
Note that in addition to storing sensitive data as a secret text, Jenkins also supports other types of credentials like a secret file, username and password, certificate, etc.
Email notification
You can get notified of the events happening in the Jenkins jobs. There are Jenkins plugins for Slack, Mattermost, and email. As email is the primary source of online communication, let’s see how to configure it using the Mailer Jenkins plugin. If you’re interested in learning about sending alerts to a Mattermost channel, check out this tutorial on using incoming webhooks.
You may want to send a notification to your team when a job has failed. To do that, go to Manage Jenkins -> Configure System, under System Configuration section. Scroll down until you find E-mail Notification (not Extended E-mail Notification) section.
Enter your SMTP server. Let’s say you want to configure a Gmail account to send emails to your team. In this case, you will configure smtp.gmail.com as the SMTP server.
Then click on the Advanced button. Enter the SMTP port of Gmail which is 465. Click on Use SSL check box and then click on Use SMTP Authentication. Under the authentication subsection, you’ll find the user name that should be the Gmail account you want to use to send your notifications. You’ll also find the password which is the SMTP password of the email service provider (Gmail in this case).
To get this password, apply the following steps:
- Click on your profile picture at the Gmail account you want to set up
- Click on Manage your Google Account button
- Choose Security tab on the left panel
- Under Signing in to Google section, make sure you have 2-step verification. If it’s not enabled, click on it to do that verification
- Click on App passwords. After you enter your password, you’ll find a new page asking you for a dropdown like this:

Choose Other and name the app whatever you want. I will name it Jenkins. You will then have a pop-up window with a password to copy — This is the SMTP password that you should paste it to the Jenkins configuration.
So now after you set up the email notification configs on Jenkins, let’s test that setup first before we implement it on Jenkinsfile.
Scroll down until you find this checkbox: Test configuration by sending test e-mail. Tick it, type the email recipient, and then hit the Test configuration button. You should now see an email sent to that recipient. Click Save and then let’s see how to set up the pipeline.
A useful use case for email notifications is to send it whenever there is a failure in the pipeline. So wrap it inside a failure post condition like the following:
// ..
post {
    // ..
    failure {
        echo "This will run if the job failed"
        mail to: "[email protected]",
             subject: "${env.JOB_NAME} - Build # ${env.BUILD_NUMBER} has failed",
             body: "For more info on the pipeline failure, check out the console output at ${env.BUILD_URL}"
    }
    // ..
}
The mail step here is calling the Mailer plugin with the following arguments: to, subject, and body. Be sure to change the address to your email. To be able to test sending the email, you have to make the pipeline fail. You can achieve that by deleting the 'aws-access-secret-key' credential, for example.
Now when you run the Jenkins job, you’ll find a failure status. Check the email that you sent. It should look like the following:

Deployment
Deployment is an important stage in continuous delivery to release reliable software. In the software lifecycle, there are multiple environments that developers test their code on before they ship to production and serve customers. Here you will learn a super simple use case to set up deployments in two phases: staging and production. Here is the updated section of the Jenkinsfile:
// ..
stages {
    // ..
    stage("Deploy to Staging") {
        steps {
            sh 'chmod u+x deploy smoke-tests'
            sh './deploy staging'
            sh './smoke-tests'
        }
    }
    stage("Deploy to Production") {
        steps {
            sh './deploy prod'
        }
    }
}
// ..
So in the staging deployment stage, we changed the permissions of two scripts deploy and smoke-tests to be able to run them. Alternatively, you could make Jenkins the root user. But if you choose the latter option, take care that the privileged user doesn’t damage your system.
We then ran the deploy script, which is a dummy script:
For the staging stage, it should echo the following: “Deploying to staging“
And then a smoke tests script is run which is also a dummy one for demonstration purposes:
#!/usr/bin/env bash

echo "Running smoke tests..."
Finally, the production deployment stage should have this log: “Deploying to prod“.
You can also use an input step in a new stage to do a sanity check before shipping to production. This will ensure everything is working fine in the staging environment and you can decide whether you want to proceed or abort. The input step puts the pipeline on hold until you take that action. Here is how you can do it on Jenkinsfile:
// ..
stage("Deploy to Staging") {
    steps {
        sh 'chmod u+x deploy smoke-tests'
        sh './deploy staging'
        sh './smoke-tests'
    }
}
stage("Sanity Check") {
    steps {
        input "Should we ship to prod?"
    }
}
stage("Deploy to Production") {
    steps {
        sh './deploy prod'
    }
}
// ..
Visualize what will happen when you run the job:

Don’t forget to check out the code here on Github.
Learn more about CI/CD
Now, you can run a full CI/CD pipeline using Jenkins and apply continuous development that facilitates development and QA work. Defining your workflow in a Jenkinsfile is intuitive and user-friendly. Linking to your source code on a source version control is as easy as cloning a repo on your local.
This tutorial covered how to set up Jenkins on docker. It went deeper into a Jenkins pipeline example using Jenkinsfile. You learned about stages and steps, and how to use post actions after the Jenkins job is done. You learned about environment variables and how to define and use them. You learned about credentials, and how to configure and call them. You learned how to configure email notifications to send updates to your team about failed jobs. You also demonstrated that in a clear way. And finally, you were able to run a deployment on staging and then ship to prod.
Interested in learning more about setting up CI/CD pipelines? Read this article on setting up a Jenkins CI/CD pipeline for your Golang app, and this one about designing secure CI/CD pipelines.
This blog post was created as part of the Mattermost Community Writing Program and is published under the CC BY-NC-SA 4.0 license. To learn more about the Mattermost Community Writing Program, check this out.


