User Authentication with the Django Rest Framework and Angular
In this tutorial, we’ll build a user authentication system for a web application with Django, the Django Rest Framework (DRF), and Angular.
Our system will include a back-end Users API that stores user data and login credentials in a database and authenticates users with DRF’s token-based authentication. The front-end interface will be written in Angular and will include a login form and a user profile page where users can view their profile data.
Once you’ve completed this tutorial, you’ll have a solid understanding of the underlying mechanics and design patterns for user authentication in both Django-built back-end APIs and front-end Angular applications.
Prerequisites
- Python version 3.6 or higher
- An active LTS or maintenance LTS version of Node.js
- Google Chrome
Token-based authentication and single page applications
In a traditional web application, user authentication typically works by storing a user’s session information on the server when they log in, along with a unique session ID that is stored in the browser and used to associate that session data with the appropriate logged in user for each request.
This approach works well when your backend and frontend code live on the same server and there’s ample space in memory to store the session data for all of your website’s users.
However, in a more modern, scalable application architecture which might include one or more containerized and replicating backend APIs, multiple mobile clients and a single page application (SPA) frontend built in a framework like Angular, Vue or React, a different approach is needed.
Token-based authentication provides a way to manage user identity and authentication across multiple clients and servers by storing user information in the form of a unique token on the client side and sending that token along with each request to be validated by the server for the logged-in user.
The goal of this tutorial is to provide a basic understanding of the techniques utilized on both the client and server side for managing user authentication in an SPA-style architecture. We’ll use the Python web framework, Django, and its popular Django Rest Framework (DRF) package to build our backend API. We’ll also use TypeScript and Angular for our frontend interface and client-side authentication code.
That said, the techniques we’ll explore can be used across frameworks and languages commonly utilized in modern web applications. For the sake of simplicity and in order to understand the underlying concepts of these authentication patterns within the span of this tutorial, we’ll use DRF’s built-in support for token-based authentication.
However, as noted in their documentation, this is a “fairly simple implementation” for user authentication, and there are several third-party Python packages available to provide increased security measures such as expiring tokens, per-client tokens, and server-enforced token deletion.
Setting up your Django project
The entire code for the Django portion of this tutorial can be found in this repository.
Before installing the Django framework, create an outer project directory to hold your Python virtual environment. We’ll eventually store the code for the frontend and backend of our app inside this folder as well.
If you’re working on a Mac OSX or Linux machine, enter the following commands from the command line:
$ mkdir django-angular-auth
$ cd django-angular-auth
$ python3 -m venv django-angular-auth-venv
$ source django-angular-auth-venv/bin/activate
On Windows, enter these commands in a command prompt window:
$ md django-angular-auth
$ cd django-angular-auth
$ python3 -m venv django-angular-auth-venv
$ django-angular-auth-venv\Scripts\activate
After running these commands, you should see the name of your virtual environment in parentheses at the beginning of your command prompt, indicating that the environment has been activated. Now, let’s go ahead and use Python’s pip package manager to install Django along with a few other dependencies that we’ll be using to build our app:
$ pip install django djangorestframework django-cors-headers Pillow
With Django installed, we’re ready to generate our project’s backend code repository. From the django-angular-auth directory, alongside your virtual environment, run the following commands:
$ django-admin startproject django_angular_auth_api
$ cd django_angular_auth_api
$ python manage.py runserver
Now, if you go to https://127.0.0.1:8000/ in your computer’s web browser, you should see the Django launch screen, which indicates that Django has been successfully installed and you’re ready to start building your project:

Building the User API
Although Django was originally developed as a powerful tool for building traditional, server-side-rendered web applications, it can be expanded into a fully-featured REST API backend with the use of DRF.
We already installed DRF along with Django when setting up our project. But we still have a bit of configuration to do before we can put it to use in building out our Users API.
Open django_angular_auth_api/django_angular_auth_api/settings.py and add the following apps to your project’s INSTALLED_APPS setting:
INSTALLED_APPS = [
    …
    'rest_framework',
    'rest_framework.authtoken',
    'corsheaders',
]
Here, we include DRF itself along with the authtoken app that we will use to authenticate our app’s users and the corsheader app to allow cross-domain HTTP requests and responses to take place between the frontend and backend of our app. In order to enable the corsheaders app, it must also be added to the top of MIDDLEWARE setting list here:
MIDDLEWARE = [
    'corsheaders.middleware.CorsMiddleware',
    …
]
Next, add the following settings, which tell Django where to store file uploads for images, since we’ll be storing user profile pics:
import os
…
MEDIA_URL = '/media/'
MEDIA_ROOT = os.path.join(BASE_DIR, 'media')
Finally, at the bottom of your settings.py file, add the following lines:
REST_FRAMEWORK = {
   'DEFAULT_PERMISSION_CLASSES': [
       'rest_framework.permissions.IsAuthenticated',
   ],
   'DEFAULT_AUTHENTICATION_CLASSES': (
       'rest_framework.authentication.SessionAuthentication',
       'rest_framework.authentication.TokenAuthentication',
   )
}

CORS_ALLOWED_ORIGINS = [
   "https://localhost:4200",
]
The REST_FRAMEWORK setting allows for configuration of various DRF features and functionalities. Most importantly, for our purposes, we include the 'rest_framework.authentication.TokenAuthentication' authentication class to enable token-based authentication for logging in users. CORS_ALLOWED_ORIGINS is a list of external domains that we allow to communicate with our API. In this case, we include the default Angular port running on localhost that will be used to serve our project’s front-end code while developing.
With our Django app configured to use DRF, we’re now ready to create our Users API. Let’s start by running Django’s startapp management command:
$ python manage.py startapp usersNow you should see a new users folder at the root of your Django project with all the boilerplate files and folders needed to begin writing a custom Django app. Open your django_angular_auth_api/django_angular_auth_api/settings.py file and add ’users’ to the list of installed apps:
INSTALLED_APPS = [
    …
    ‘users’,
]
Next, add this line to the same settings.py file to tell Django that we are extending the built-in User model to add some additional data and functionality for our own custom User model:
AUTH_USER_MODEL = 'users.User'With this setting in place, we can go ahead and define that model by editing django_angular_auth_api/users/models.py to look like this:
from django.contrib.auth.models import AbstractUser
from django.db import models


class User(AbstractUser):
    bio = models.TextField(blank=True)
    profile_pic = models.ImageField(blank=True)

    def __str__(self):
        return self.username
Django’s AbstractUser model provides many tools for user authentication and management out of the box. Here, we simply extend that model by subclassing in order to add the bio and profile_pic models fields which will be displayed on the user profile page of our application.
After defining our User model and adding the AUTH_USER_MODEL setting, we can run the makemigrations and migrate Django management commands to add the users table to our project’s database:
$ python manage.py makemigrations
$ python manage.py migrate
Now, you should see a new database migration file created in your users app as well as output in your terminal indicating that your database tables have been successfully created alongside the rest of the built-in Django and DRF tables that we’ll need to build our authentication system.
Since we will be authenticating our users from the frontend of our web application, we will need a way for the browser to keep track of the user that is currently logged in. A common pattern for persisting the identity of the logged-in user on the client side is to use a unique user token, such as a randomly generated string of characters, provided by the server and stored in the browser’s Local Storage via the Window.localStorage Web API. This token is then sent along with each subsequent HTTP request following authentication to identify the user. For this tutorial, we will use DRF’s built-in token authentication.
DRF tokens are stored in their own database table along with a reference to their associated user, so we need to tell Django to create a new token whenever a new User instance is created.
Django signals provide an interface for just these kinds of communications between the models in various apps of a Django project. In our django_angular_auth_api/users/models.py file, let’s define a decorated receiver function that will catch the post_save signal of our custom User model. To do that, add the following lines of code to that file:
from django.conf import settings
from django.dispatch import receiver
from django.db.models.signals import post_save
from rest_framework.authtoken.models import Token
…
@receiver(post_save, sender=settings.AUTH_USER_MODEL)
def create_auth_token(sender, instance=None, created=False, **kwargs):
    if created:
        Token.objects.create(user=instance)
This code tells Django to listen for newly created User model instances and create an associated Token model instance that we can then provide to our client-side application when a user logs into the site via the web interface.
Now, let’s register our User model with the Django admin site so that we can add some user profile data via our project’s admin dashboard. Add the following lines to django_angular_auth_api/users/admin.py:
from django.contrib import admin
from .models import User

admin.site.register(User)
Before we can add any user profile data, we need to create our project’s first user. One way to do that is to run python manage.py createsuperuser and enter your own login credentials at the prompts.
In order to focus on authenticating users in this tutorial, we’ll use Django’s built-in user registration functionality. However, many of the same principles that we explore for logging in users will apply for custom user registration systems or for third-party options such as OAuth 2 and Auth0.
After creating your superuser account credentials, you can log into the admin dashboard for your project by pointing your browser to https://127.0.0.1:8000/admin/. Once you’ve logged into the Django admin, you should see something like this, with each section representing one of your registered Django applications, and each link below referencing a model from that application:
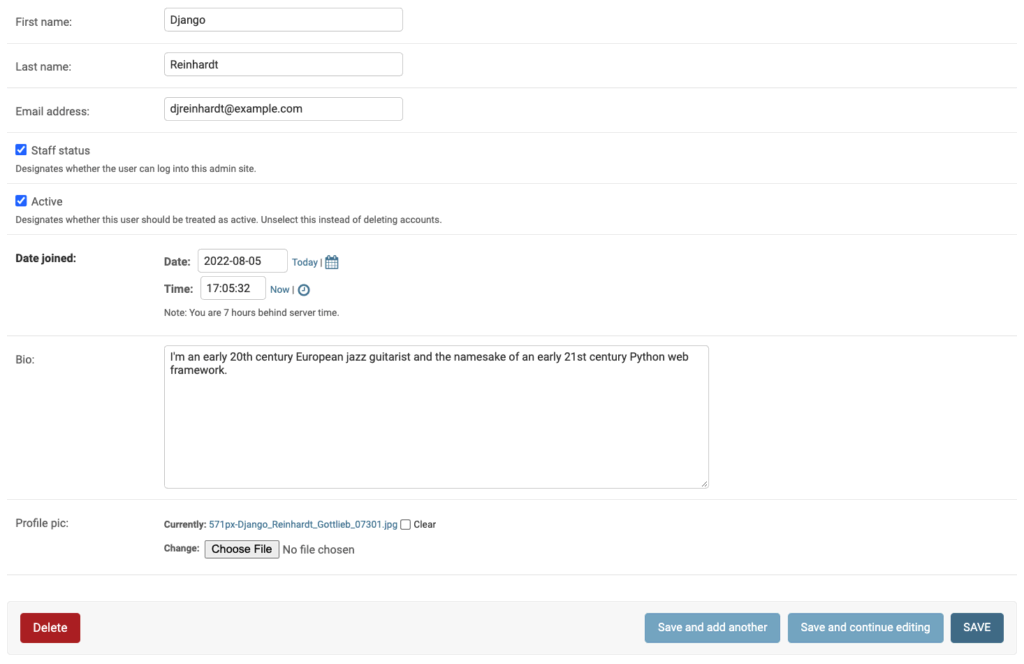
Click on Tokens and you should see the Token instance that was created for your user. Return to the main admin page and click on Users to view your own User model instance listed in the table. Click on the link for your username, and you’ll see all the fields provided by the default Django user model, as well as our custom Bio and Profile pic fields at the bottom of the page.
Go ahead and add your first and last name, write up a little bio for yourself, upload an image to use as your profile pic, and click Save. We’ll use this data later for displaying on the user profile page of our web application.
Great! Now that we’ve defined our custom User model and created a User instance with some unique profile data, we can use DRF to build a REST API for the frontend of our web application to consume.
The purpose of our REST API is to provide an interface for our client-side code to interact with in order to perform CRUD actions on the data in our project’s database. An important piece of that puzzle is the translation of that data through a process known as serialization into a format that our client-side code can understand. DRF provides various Serializer classes for this very purpose that we will use to transform the data from our Django models into serialized JSON data.
Create a new file at django_angular_auth_api/users/serializers.py and add the following code:
from rest_framework import serializers
from .models import User


class UserSerializer(serializers.ModelSerializer):

    class Meta:
        model = User
        fields = ('id', 'username', 'first_name', 'last_name', 'bio', 'profile_pic')
        read_only_fields = ('username', )
The DRF ModelSerializer class allows us to serialize the data from our Django models into JSON format, referencing specific fields from our database, validating that data according to its type and establishing read/write permissions. Our UserSerializer class will be used to retrieve and display user data via our frontend application’s user profile page after a user has successfully logged in.
With our serializer defined, we now need to write our views. In a Django project, these refer to the functions or classes that map to each endpoint of our web application. Because REST APIs follow a conventional pattern of endpoint design — where database resources are defined in the URL path and the actions performed upon the data are derived from the HTTP verbs such as GET (read) or POST (create) specified in the request — DRF provides ViewSet classes that can generate a RESTful URL scheme for your application directly from your model definitions in very few lines of code, similar to class-based views in a traditional Django project.
Open django_angular_auth_api/users/views.py and replace the contents of that file with the following code:
from rest_framework import viewsets
from rest_framework.permissions import IsAuthenticated
from rest_framework.authtoken.views import ObtainAuthToken
from rest_framework.authtoken.models import Token
from rest_framework.response import Response

from .models import User
from .serializers import UserSerializer


class UserViewSet(viewsets.ModelViewSet):
    queryset = User.objects.all()
    serializer_class = UserSerializer
    permission_classes = [IsAuthenticated]


class UserLogIn(ObtainAuthToken):

    def post(self, request, *args, **kwargs):
        serializer = self.serializer_class(data=request.data,
                                           context={'request': request})
        serializer.is_valid(raise_exception=True)
        user = serializer.validated_data['user']
        token = Token.objects.get(user=user)
        return Response({
            'token': token.key,
            'id': user.pk,
            'username': user.username
        })
The UserViewSet class utilizes our UserSerializer to return user data only to authenticated users based on DRF’s built-in `IsAuthenticated` permission class. DRF also supports custom permission classes, which can be used to limit user access to only data that they have created, for example.
In a real-world authentication system that included custom user registration, additional logic would be needed here for creating users and storing their passwords. One option is to use Django’s built-in User.objects.create_user() method, which performs hashing of the user’s password so it isn’t stored in the database as plain text, as we did when creating our user with the createsuperuser management command.
Our UserLogIn class extends DRF’s ObtainAuthToken view, which provides only the token string by default in order to return some additional user data to our frontend application that can be used to display the logged in user’s name, as well as the user’s database ID for querying additional user-specific data.
Now that we’ve defined our API’s view classes, the only thing left to do is wire them up the appropriate URLs. Open django_angular_auth_api/django_angular_auth_api/urls.py and replace the contents with the following code:
from django.conf import settings
from django.urls import path, re_path, include, reverse_lazy
from django.conf.urls.static import static
from django.contrib import admin
from django.views.generic.base import RedirectView
from rest_framework.routers import DefaultRouter
from users.views import UserViewSet, UserLogIn

router = DefaultRouter()
router.register(r'users', UserViewSet)

urlpatterns = [
    path('admin/', admin.site.urls),
    path('api/v1/', include(router.urls)),
    path('api-user-login/', UserLogIn.as_view()),
    path('api-auth/', include('rest_framework.urls', namespace='rest_framework')),
    re_path(r'^$', RedirectView.as_view(url=reverse_lazy('api-root'), permanent=False)),
] + static(settings.MEDIA_URL, document_root=settings.MEDIA_ROOT)
Here we register our UserViewSet class with the DRF `DefaultRouter() instance to automatically create the RESTful endpoints for our Users API. In our url_patterns list we also include Django’s admin urls for accessing the admin interface, we prepend our API urls with the conventional api/<version>/ path. We define a custom url path for our UserLogIn view, and include DRF’s api-auth urls for authenticating users to access the web-based browsable API interface. Finally we catch any other url patterns and redirect to the DRF api-root location and we add the static media path for accessing our users’ profile pics after they are uploaded to the media folder.
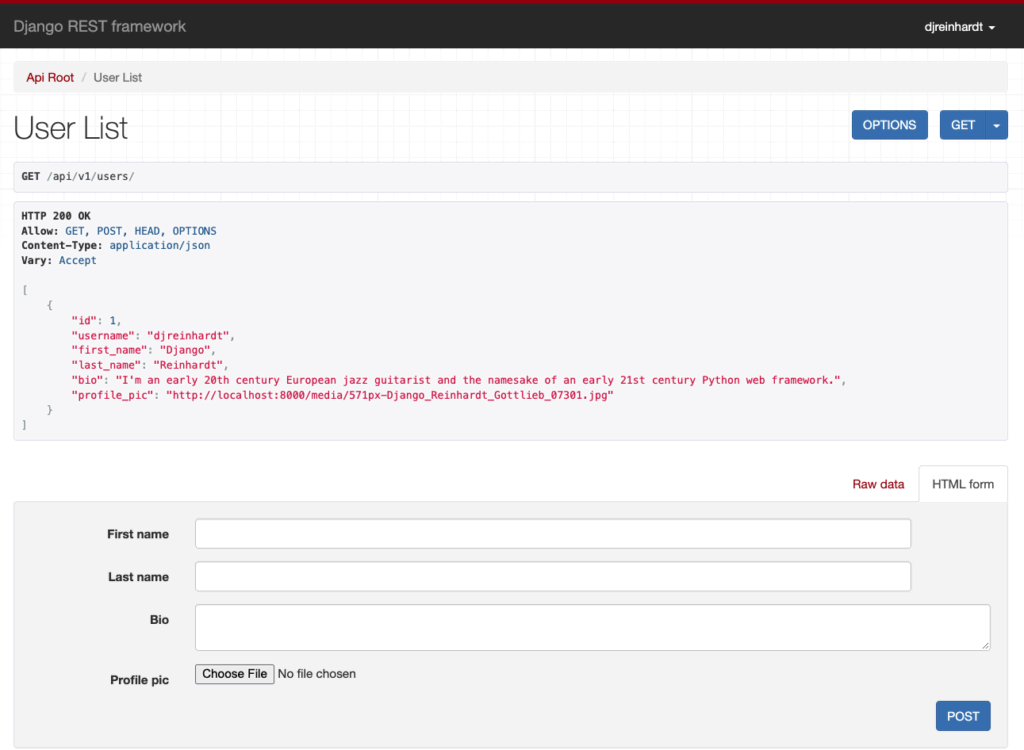
Now, let’s test out our Users API by navigating to DRF’s browsable API at https://localhost:8000/api/v1/ in your browser with the Django development server running. When you log in with the user credentials that you created via the createsuperuser management command, you should see the API root page of the browsable API:
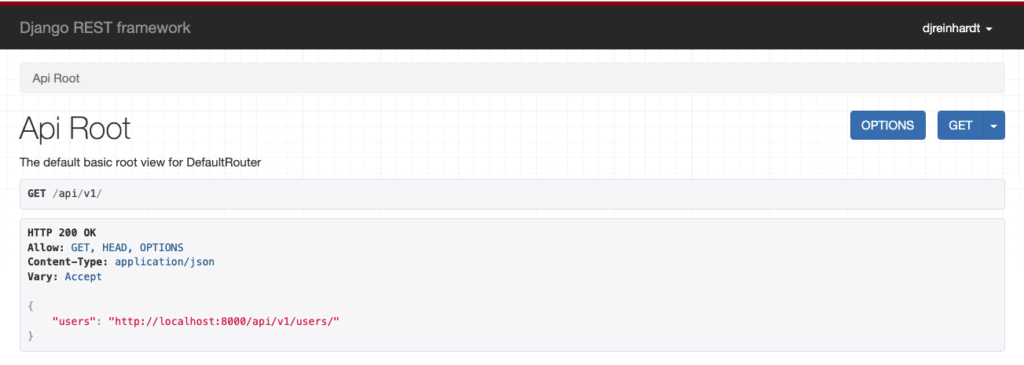
Click on the link to the users API path, and you’ll see a list of User model data, including the new user you created.
With our User API defined and working, we can now move on to building the frontend of our web application with Angular.
This blog post was created as part of the Mattermost Community Writing Program and is published under the CC BY-NC-SA 4.0 license. To learn more about the Mattermost Community Writing Program, check this out.


